Friday, December 30, 2011

Foodie Friday: Cream Cheese Danish


Cream cheese danishes are delicious. I had never thought of making my own, and when I stumbled upon this recipe I decided to give it a go. It was delicious and so simple because the crust is made out of crescent rolls!

This recipe makes 8 servings. I baked it in my 9x13" pan and it was the perfect size to cut into 8 pieces. You could cut the recipe in half, do it in an 8x8" pan and have 4 large or 6 small servings. Make sure you refrigerate it if you aren't serving it within an hour or two of baking it. I think the danish is delicious cold, but Jason said he liked it warm!

You will need:
  • Danish:
    • 2 8oz packages of cream cheese softened
    • 2 8-count packages of crescent rolls (I used butter flake)
    • 3/4 cup sugar
    • 1 egg yolk
    • 1 tsp vanilla
    • 1 tsp lemon juice
  • Glaze:
    • 1 cup confectioners sugar
    • 1 tbsp butter
    • 1 tsp vanilla 
    • 1/4 cup milk (or less)

  1. Preheat oven to 350F
  2. Grease 9x13 pan and place 8 crescent rolls (1 package) on bottom, un-separated
  3. In a large bowl, beat together the rest of the danish ingredients and spread over crescent rolls
  4. Open second can of crescent rolls and break off 4 rolls individually. I usually let the dough stretch out a little and then place it over the cream cheese mixture however you see fit/pretty
  5. Bake for 30 minutes, or until the filling isn't completely jiggly and the crescent rolls are golden brown
  6. While cooling, make the glaze by melting your butter and then whisk the rest of the glaze ingredients together
  7. Drizzle over the danish and serve once it's cooled

Have some fun with it! Try using the crescent roll dough and reshaping it, maybe cutting it with a cookie cutter, to decorate the top of your danish!

Tuesday, December 27, 2011

Craft Tuesday: Tackling Crayon Art


This project was fun. Awesome, super fun. Almost therapeutic because of the simplicity of it all, and all the colors are just so crazy and cool.

Alright, so I have seen this crayon art ALL over Pinterest. It is awesome and everyone wants to do it. There are two methods to do doing it that I know of: 1)Hot glue the peeled crayons and use a blow dryer to melt them. 2)Run crayons through your hot glue gun.

My friend Brittnee and I decide to tackle this project together, in a two-part adventure. This is part-one. We opted to try the hot glue gun method first because we figured it would give us more control over the colors and where we place them. Plus, at the end we wouldn't have crayon chunks hot glued onto our canvases.

Well, it didn't go as smoothly as we thought and I definitely have some suggestions for you if you are going to try the hot glue method. First of all, use a new glue gun (or a glue gun with no glue in it) that you are using ONLY for crayons, because this WILL get messy and you will probably never be able to use your glue gun for regular gluing again (unless you really, really clean it well). I bought a new hot glue gun the day after I did this project. I will probably be able to salvage my other one, but I use mine for LOTS of stuff, and I need nice, clean one for all the other projects I do. Second, you really have to test out the waters to see what heat setting you want to use and how your glue gun will be most effective when it comes to pushing these crayons through.

Wax melting out the side means burnt fingers :(

Our biggest problem was that my glue gun wouldn't "grab" onto the crayons to push them through, so we had to push them through with another crayon. Then the wax ended up melting out the side AND through the glue gun hole, so it was a little...leaky. This got messy and frustrating. Perhaps if you use a glue gun that uses the small glue sticks this problem would be solved. If you are buying a cheap little glue gun specifically for this project (which is not a bad idea at all) then I would recommend you try that kind.

Okay, now that I have told you all the ways that ours was difficult let me show you how awesome, and INCREDIBLY FUN this project was. Seriously. Most fun I have had doing a craft in a while. Of course, it could be because I had company this time!

You will need:
  • Crayons. Lots of crayons
  • Hot glue gun (that you are willing to part ways with)
  • Canvas(es)
  • Heavy drop cloth you don't mind getting melted wax on
  • Patience

We had two 7x14" canvases. The first canvas we used as an experiment canvas. We tested the different ways the wax melted and got used to "waxing." Of course, you could use a heavy piece of cardstock or cardboard to practice on, but our canvas came in a two-pack, so we figured, why not?


By laying the canvas flat and holding the gun perpendicular we were able to achieve a very cool splatter look. It was fun and stress relieving to just have at it. Then of course, we messed up our awesome painting by experimenting with the dripping effect, which is what we all see and love all over the internet (especially Pinterest).

While holding the canvas at various angles (we laid the end of the canvas on top of our upright crayon box) and pushing the crayon wax out at the top end of the canvas, we got that sought-after drip look. Hooray!

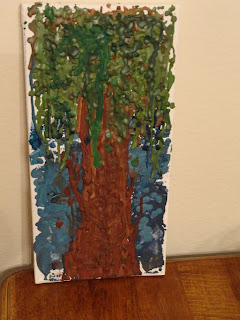
Now that we knew our way around this project, it was time to start the second canvas. Our goal was to create a tree - a weeping willow to be exact.

First, we used a light blue crayon to quickly mark of which areas we wanted to be background, tree trunk, and branches. We used several shades of blue in the splatter technique to create the background, a sky actually. While that wax was still hot we used a blue crayon and spread it out and mixed it up. Ended up pretty neat I think.


Next we began the tree trunk. Using about 8 crayons in various shades of brown we ran the crayon through the gun, moving it from side to side of the designated trunk space. When we had finished with all of the crayons, I used the hot tip of the hot glue gun to "carve" a heart in my tree trunk. Using the tip of the gun to remelt the wax is a great trick. If you have a big clump somewhere and you want to break it up, that's a great way to go about it.

Next, we flipped the canvas over so that the other end of the canvas was now propped up. We began dripping the greens out next so that the wax dripped towards the tree trunk. It took me about 2 crayons of green to flush all the brown out and then on top of that I used about 4 more. In other words, every single green and brown crayon went into this piece, and several of the blues too. Of course, we could have chosen to do reds & oranges and made the tree an autumn tree. (Hmm. Maybe I'll do that for my next one!) I tried to fill in as much of the white space as possible, but wasn't able to.


All in all, we were very pleased with how this crayon art (or "waxing") turned out. Though I burned my finger on hot wax, I think it was well worth it!

If you do attempt this, please be careful not to burn yourself and make sure you have something to protect the surface you are working on. Wax does come up, but this wax is HOT and could do heat damage.

Friday, December 23, 2011

Foodie Friday: Baked Garlic Chicken


Baked, breaded, garlic chicken. Those are 2 things I love, and one thing that is a perk. Baked, not fried, chicken. How delightful that this dish is so delicious and a fairly healthy meal! Jason and I made this for my parents and our friends on 2 separate occasions, and each time it was inhaled.

This is adapted from a Jamie Oliver recipe which sounded quite good, and I always like putting my own little spin on things. We topped it with a white wine sauce (we used Julia Child's herbal white wine sauce or "Sauce Chivry", but that was very ambitious of us), but simply squeezing some lemon juice on top would be fantastic too. As sides, we served mashed potatoes and fresh steamed broccoli, both of which tasted wonderful with the herbal white wine sauce. This recipe makes 4 servings.

You will need:
  • 4 boneless, skinless chicken breasts
  • 2 cloves of garlic
  • 15 saltine crackers
  • 1 tbsp parsley
  • 4 tbsp butter
  • 1 egg
  • 1 cup all-purpose flour
  • Pepper to taste

  1. Preheat your oven to 475F
  2. We'll start by preparing the breading. If you have a food processor, combine all your crackers, garlic, parsley, butter, and pepper (to taste) and run until you have a fine mixture
  3. If you do not have a food processor (guilty), then put your crackers, parlsey, and pepper in a large freezer bag. Crush using your hand or the bottom of a cup. Next, press your garlic into the bag. Use a fork to mash your butter and add to bag. Shake up the bag and use your hands and the cup to mix the breading ingredients together. Set bag to the side when finished
  4. Make three shallow, diagonal cuts in each side of each chicken breast. Place on a covered surface (freezer paper or a cutting board) and cover them with freezer paper or plastic wrap and beat them until they have flattened out some
  5. In a small bowl, beat your egg. On 2 separate plates, pour your flour and your breading mixture
  6. Prepare a flat baking sheet (using non-stick spray or foil) for your chicken
  7. Begin breading your chicken by first coating one chicken breast in flour. Next, dip your chicken in the egg, and then turn it over into the plate of breadcrumbs to fully coat it. Place on baking sheet
  8. Repeat breading process for each chicken breast
  9. Bake chicken for 12-15 minutes
  10. Serve as a whole breast with a lemon slice, or slice up and drizzle white wine sauce on top

Enjoy!

Tuesday, December 20, 2011

Craft Tuesday: Wrapping Paper Collage


Every year for Christmas I spend money on beautiful wrapping paper only to see it used and thrown away without ever capturing how pretty it was under our tree. Not anymore! Here is a wonderful way for you to remember the excitement of Christmas morning- a wrapping paper collage!

By Mod Podging squares of the wrapping paper you use each year onto a hefty sheet of paper or cardboard, and then placing a picture from Christmas morning on top, you can create a great piece of wall art for the holidays (or a scrapbook page).

Left: Blue reindeer, lightweight "cheap" paper wrinkled
Right: Brown and silver, heavier paper did not wrinkle
After doing this one myself, I found that the heavier the paper the better, because it won't wrinkle up when the Mod Podge is applied. From a distance though, the wrinkles are not noticeable. On the same note, my square hole punch wouldn't punch through the foiled paper, and I had to cut it by hand. Also, I would suggest tracing out the bottom line of each row of wrapping paper, otherwise your lines may tilt a little, like mine. Of course, that's all in the charm of a hand made craft!

You will need:
  • 1 12x12 piece of card stock or cardboard
  • 1 square hole punch (I used a 3" diagonal square hole punch)
  • 1 photograph
  • Black cardstock/scrapbooking paper
  • Stickers of your choice
  • Glossy Mod Podge
  • Wrapping paper scraps
  • Sponge brush

Begin by gathering up some wrapping paper scraps. You will need to punch several squares out of each sheet. I used a total of 25 squares (5 squares by 5 squares, each square measuring a little over 2"), and punched about 28 squares to choose from.


Once you have all of your squares punched, play with them and arrange them in a way that you like! This took me a few minutes and a lot of moving around, right until I had almost every square back at their starting point, until I was pleased with the arrangement!


Then make a stack for each row to keep them in order as you proceed to glue them down. Doing one row at a time, apply a thin coat of Mod Podge and then lay your wrapping paper squares down. Your Mod Podge may dry before you get to lay down the last square or two, so reapply the Mod Podge before you lay those squares down.


After you have Mod Podged all of your squares, glue down any loose corners and let dry completely. This shouldn't take more than 10 minutes, max. Now, apply one or two thick coats of Mod Podge on top to seal the squares down and give your collage a nice finished look.


While this top coat dries, glue your picture to the black sheet of paper, leaving a quarter inch border around the edge.  On another piece of black paper, use stickers to write the year or your family name. Trim to size. Once the Mod Podge is dry, trim off any excess paper and glue down the black papers with craft glue, or a little bit more Mod Podge. Do not Mod Podge over this layer.

Now you can frame your wrapping paper collage, put it in your scrapbook, or keep it somewhere special for you to look back on whenever you like.

Friday, December 16, 2011

Foodie Friday: Chocolate Coconut Bars, AKA "Pig Pens"


My friend Alyssa made these for our sorority alum meeting one night and I had her send me the recipe that night. These yummy chocolate treats are so delicious, and so SO simple to make! It takes about 5 minutes to prepare before baking. Delicious. There is no way you can mess these up, and everyone is sure to love them! If you are looking for a dessert to bring to a holiday party this year, this is a great dish to bring! You do need to let these cool for at least 2 or 3 hours before cutting, so if you are making them for an evening event make them first thing in the morning or even the night before. The longer these have to sit to yummier they are!

Make this recipe in a large pan (9x13), and it will make 25-30 small bars. I usually cut it in half and bake it in my 8x8 pan, yielding about 12-15 bars.

You will need:
  • 2 cups whole oats
  • 1 bag milk chocolate chips
  • 1 bag coconut flakes
  • 1 can sweetened condensed milk
  • 6 tablespoons of butter (3/4 stick)
  • 1/2 cup sliced almonds
  • 1/2 cup chopped walnuts

  1. Preheat oven to 350F
  2. Melt butter in microwave and spread into bottom of pan
  3. Sprinkle whole oats evenly in bottom of buttered pan
  4. Spread chocolate chips to evenly coat oats
  5. Sprinkle coconut evenly over chocolate chips
  6. Mixed sliced almonds and chopped walnuts
  7. Sprinkle nut mixture over top of coconut. You may not have to use it all. I do not like a lot of nuts on mine and I always end up picking some off while eating them
  8. Drizzle ENTIRE can of condensed milk on top
  9. Bake for 25-30 minutes
  10. Place baking dish on wire rack to cool. Allow bars to cool to room temperature before cutting and serving. This could take 2+ hours

Tuesday, December 13, 2011

Craft Tuesday: Canvas Christmas Gift Bags


Every year we buy gift bags that end up getting wrinkled up, torn, and thrown away after a few years of use. How about this year we make something that is personal, and reusable for many, many, many years to come? Using the same technique of creating a freezer paper stencil, ironing it on, and painting that I used when I created the Halloween canvas bag, you can make adorable gift bags that people will cherish as much as the gift it contains (if not more!).

I painted four 5x6" bags to give people small gifts (candy, gift cards, ornaments, etc) because when a gift is so small, I try to make it as special as possible!

In case you don't remember how to do the stenciling, this DIY contains a brief refresher!

You will need:
  • Canvas/cloth bag(s)
  • Fabric paint (Soft paint if my preference)
  • Freezer paper
  • Iron
  • Sponge brush
  • Pencil
  • Scissors

Start by cutting pieces of freezer paper to the size of your bags. Once you decide what you want your design to be, you can draw it and cut it out. Here are the designs I did and how I did them. Feel free to copy my ideas, or discard them completely!

Design #1: Snowflake


Draw a circle, or use a large circle cutter, and cut out a large circle from the piece of freezer paper you already cut to size. Fold this circle in half, then in half again, so you have a piece that resembles a slice of pie. Now cut it up just the way you did when you make coffee filter snow flakes in elementary school! I unfolded mine once or twice in the middle of cutting to see what I was doing, and how to improve it. I am not a very experienced snowflake maker, so I had to.


When you are all done, iron your stencil on, paint over your stencil. Your snowflake will be the color of your bag and the bag will be whatever color your choose. Then remove the stencil and let it dry. If you are doing a large bag, cut several (3 or 5) different size circles and make multiple snowflakes to use as stencils. Let dry according to the directions on the paint bottle before using as gift bag.

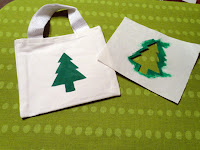
Design #2: Christmas Tree


Fold your cut freezer paper piece in half and then unfold it. Against the fold, draw half of a Christmas tree. Refold it and cut it out. Unfold and you have a perfectly symmetrical, perfectly centered tree! Hooray!


Iron stencil on, paint in the tree-shaped hole, and remove stencil. Let dry for about 30 minutes and then decorate your tree. I used a pencil eraser dipped in paint (and dabbed on a napkin to remove excess paint) to create the ornaments and "star" on top of the tree. Simple. Let dry according to the directions on the paint bottle before using as gift bag.


Design #3: Snowman


Draw a circle, or use a circle cutter, and cut out a large circle from the piece of freezer paper you already cut to size. This will be the shape of your snowman's head. Just like with the snowflake, you will be painting around the stencil, painting the background, leaving the snowman's head the color of the bag. Of course, if you are using a colored bag and want to paint the snowman's head white, then still cut out the circle, just iron on the piece of freezer paper with the hole in it. Iron on stencil, paint, peel off, and move on to the snowman's face. I used the non-cap end of a Crayola marker as my stamp for the snowman's eyes and mouth. Dip it in the paint and dab off the excess paint on a napkin before stamping it on. Use the tip of your foam brush to create the nose (you might want to practice before doing it on the bag itself). Let dry according to the directions on the paint bottle before using as gift bag.


Design #4: Ornament


Using the same piece of paper I used for the snowman stencil, I created the ornament. While I used the circle that I removed for the snowman head, I used the paper that the circle was removed from for the ornament shape. Iron on the sheet of freezer paper with a big hole in it, paint, remove the stencil, and let dry for 30 minutes before decorating your ornament. I used a small circle (marker cap) to create a ring of circles on the ornament and then free handed the ornament top. Let dry according to the directions on the paint bottle before using as gift bag.


In case you were wondering, here is the before and after decoration. A little bit really does go a long way!


Phew. That was fun! I can't wait to give them away filled with fun goodies!
Merry Christmas and happy crafting!

Sunday, December 11, 2011

Inspiration Sunday: Let it Snowmen


I love decorating with snowmen. My mom loves them, and so do I. They are just such a friendly, seasonal thing. They embody the pure fun you have when playing in the snow. Honestly, who doesn't love a good snowman? Well, here are ten fun snowman themed crafts I found that you can do at home, no snow at all! This way you can admire snowmen whether it's 50 degrees, or 5!

Snowman made out of stacked circles. A great new perspective from
Life Is What You Make It.

A "melted snowman" ornament made from Elmer's glue.
From Holiday Kids Crafts.

Make a snow man from undecorated wreaths!

This adorable primitive snowman is make from
wooden blocks and can be found on Etsy.com.

Talk about an easy snowman! Using a variety
of nuts and a single washer, you can make this adorable
snowman ornament.

A twine-ball snowman. Great for the craft room.
From Better Homes & Gardens.
Also, see my yarn snowman here DIY.


A popsicle snowman. Delightful!
From Kid's Activities.

Snowman from two stacked pots. Simple!
From All Kids.

Powdered doughnut snowmen. A yummy Christmas morning treat?
From Creative Gift & Party Ideas.


Ice cream snowman! How fun!

Friday, December 9, 2011

Foodie Friday: Butterbeer


In case you haven't caught on yet, I am a pretty big nerd. And one of the things I LOVE is Harry Potter. Over the past few years I have tried a couple of different Butterbeer recipes in attempts to make myself feel a little more like a Hogwarts student, and I thought I would share my favorite one with you!

Butterbeer is a delicious, sweet, warm drink. Did I mention it's really sweet? I like sweet things, and I feel like while this drink is sweet, it's not overly sweet like some desserts. This Butterbeer has a good balance to it and it is simply delightful to drink on a cold night, snuggled up on the couch. Or make a big batch and serve it at a holiday party!

This recipe makes 4 servings and is from The Pastry Affair. They adapted the recipe from Huffington Post. Like I said, there are lots of Butterbeer recipes floating out there on the internet.

You will need:
  • 4 12-ounce bottles cream soda, room temperature
  • 1 cup brown sugar 
  • 3/4 cup heavy cream
  • 4 tablespoons butter 
  • 1 teaspoon apple cider vinegar 
  • 1/2 teaspoon salt  

    Steps 1 & 2
    1. In a small saucepan, bring brown sugar and 2 tbsp water to a gentle boil. Let boil for one minute and then turn heat off. If you have a candy thermometer, the mixture should be 240F
    2. Add butter, salt, vinegar, and 1/4 cup heavy cream and stir until fully incorporated
    3. Allow to cool (the original recipe calls to be cooled to room temperature but I wanted to serve mine warm and not cold so I just let it cool for a few minutes so it wasn't scalding hot)
    4. Beat remaining heavy cream and 2 tablespoons of the brown sugar to make whipped cream topping (if you opt to use premade whipped cream, it won't have the same flavor or texture, but will still taste delicious)
    5. In 4 separate glasses, pour in 1/4 cup brown sugar mixture and 1/4 cup cream soda and stir together
    6. Fill the glasses the rest of the way with cream soda
    7. Top with whipped cream and serve immediately

    Tuesday, December 6, 2011

    Craft Tuesday: Christmas Card Ornaments


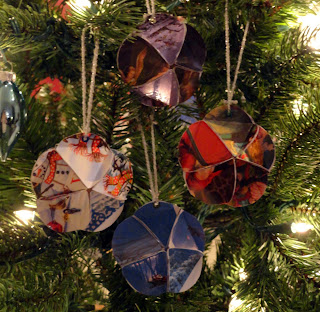
    Do you have old Christmas cards that you can't seem to part with, but you really have no idea WHY you are keeping them?  I know lots of people that do and THIS is the perfect craft for all of us. Ornaments for your tree (or for a friends) that are so simple to make! Instead of old cards, I used some of the Christmas card fronts that National Geographic sends to lure you into buying their beautiful cards. It worked so well! Completely free, and I was using something I would have normally thrown away.

    This idea I found originally on Martha Stewart's website, so I can't claim too much credit for "discovering" this craft, but I can take credit for doing it, successfully, and slightly modifying it. Hooray!

    You will need:
    • Christmas cards (or just their fronts)
    • Hot glue gun (or other quick drying adhesive)
    • Yarn/thread
    • Small circle to trace
    • Scissors
    • Ruler
    • Pen

    Before beginning, let me tell you that the way I did this varies from Martha Stewart's "Holiday Card Ornments." I designed mine so that you can use 10 circles (1 card front) and not 20 circles. I did this just by cutting out the middle row of 10 circles. So if you want to make yours bigger, take a look at how she does it!

    Pick your cards well. If you look at my selection of cards you'll see that I had some I did not end up using. They were fairly monochromatic- black and white, with a splash of red. Those pictures cut up wouldn't have looked as festive, so I skipped those and used the more colorful, detailed images.

    Trace your stencil to create rows of circles on your card. I would suggest drawing the circles on the back of the picture so that you don't get pen marks on the pretty side. On each card I was able to fit 12  circles (3 rows of 4) and then choose my favorite 10 to use. Keep in mind what your picture looks like  and if there is one particular part of the picture you want to keep in tact. I made my circles about 2" big. If you have a circle cutter/punch then you can use that. Mine was not staying locked at 2" so I had to do it by hand with some good ol' Fiskars and it worked just as well, even though the edges weren't perfect.


    After you cut out your circles, draw an equilateral triangle that fits inside your circles. Mine was about 1 1/2" on each side. It's easiest to make a triangle template out of paper or cardstock and then trace it onto each circle. These triangle lines will be the lines that you will fold on. If you have a scoring blade, score on these lines before folding them for a neater fold. Guess who doesn't have a scoring blade? Me! Still turned out fine, so don't worry about that. Once all of the triangles have been drawn/traced, fold towards the side of the card that you want to show (see picture above).

    Now it's time to glue them together! I used my hot glue gun on a low heat setting and put a small dab on one flap of one circle, then stuck it to another circle, with 2 top points touching (think of the way pie or pizza slices meet in the middle). Create a rounded ring of 5 folded circles using this method then repeat. Once you have two pieces like this, use the hot glue to attach the available flaps to one another. Now your ornament in constructed! To really make your ornament polished looking, shellac it before moving on to the next step.


    Next, use a small hole punch (like an eyelet hole punch) or a large needle to create a hole to thread pretty yarn or thick ribbon through. Tie it up and your ornament is complete.

    Hang it on a tree, top a package, or give it to a friend! Hopefully you were as successful as I was, if not more so! I would love to see your completed ornaments or other Christmas card projects. Submit then for Let's Brag Thursdays and maybe you'll see them posted soon! :D Happy crafting!


    Some other ideas:
    • Every year when you send out a Christmas card, turn on of those cards into an ornament. On the string, attach a small piece of paper the says the year. This way you will have a collection of all your your Christmas cards too!
    • Use these ornaments as jar/vase fillers, instead of the traditional glass ball ornaments.

    Friday, December 2, 2011

    Foodie Friday: Oatmeal Chocolate Chip Cookies


    Hope everyone had a wonderful Thanksgiving weekend! WELCOME TO DECEMBER! My favorite month of the year! I know the last thing we need right now is more food, but trust me, you'll definitely want this delicious treat.

    I love oatmeal chocolate chip cookies about 100 times more than oatmeal raisin cookies. I like to fool myself into thinking they are better for me than other cookies because of the oatmeal. Makes sense, right? Well, even if it doesn't, let's all agree to pretend for my sake, okay?

    This recipe is based on the classic Quaker Oats recipe. I fiddled with it a bit though, wanted to make a denser cookie, a little richer. So here was the end result. Turned out pretty well I think! This recipe makes about 3 dozen cookies, which are the best when served warm!

    You will need:
    • 3 cups oats
    • 1 ½ cups all-purpose flour
    • 1 cup brown sugar
    • 1 cup milk chocolate chips
    • 8 tbsp (1 stick) and 6 tbsp butter, softened
    • 1/3 cup granulated sugar
    • 2 teaspoons baking powder
    • 1 teaspoon cinnamon
    • 1 teaspoon vanilla
    • Dash of nutmeg


    1.     Preheat oven to 350 degrees Farhenheit
    2.     In a large bowl beat together sugars and butter until creamy
    3.     Add eggs and vanilla to bowl and beat into sugar mixture
    4.     Mix in flour, baking powder, cinnamon, and nutmeg, beating until fully incorporated
    5.     Stir or beat in oatmeal in 2-3 batches
    6.     Stir or beat in chocolate chips
    7.     Cover a cooking sheet with parchment paper (or foil) and scoop 1” balls of cookie dough onto sheet, leaving gaps of at least 1” between cookies
    8.     Bake for 8-10 minutes