Tuesday, March 20, 2012

Craft Tuesday: Simple Stretch Bracelets


Bracelet making is probably something we all did when we were little. There are so many great bead options to make fun, fashionable bracelets that it really is worth while to make your own bracelets now! I was on the hunt for some fun, purple beaded bracelets. I hit up all the department stores and Target, and everything I found that I liked was going to cost me at least $30 to have a set. I moped, and then thought to myself, "Duh, you are a crafter. You should MAKE your bracelets!"

So I did.

My inspiration was a set of purple bracelets I saw at Dillard's, where one bracelet was $20. They were made out of very similar purple plastic beads that were "crystal cut." I went to JoAnn and bought a large bag of similar plastic beads (Urban Ice) for $5, a spool of 60' of stretch cord for $4, and a pack of 10 silver-plated beads for $5. After I used some 40% off coupons, I spent less than $10 at the store, and I still have beads and LOTS of cording left over.

So maybe this blog entry is less about teaching you HOW (which I do) and more about making you aware of the money-saving possibilities at your fingertips (which I did)!


To start, measure your wrist using a flexible tape measure or string. Mine was 6.5" around. Add on 4 inches (2" onto each side for tying knots). So my cord was cut to 10.5" long.

Next, use a binder clip or paper clip and clip off the end of the string, leaving the 2" excess. This clip will act as a bead stopper.

Place your string to the side and begin arranging your beads. I first laid mine out and separated them into different shapes and colors. My bag had quite a variety so I had lots of little piles. After you do that, it's time to start choosing your beads!

I am not a big fan of simple patterns like purple, pink, purple, pink, etc so this is how I did mine: I picked on bead to repeat, and did so every 3rd or 4th bead. Next to that bead I put a silver one, and then in between those I just filled in with a fun variety, making sure not to have two similar beads too close together. Simple to do and it looks a little less like Claire's jewelry.


If you are making a set (I made 3), then try to vary the sizes of beads you use by bracelet. I made one using the large beads, one using large & medium beads, and one bracelet using only the small beads. When they are stacked on my wrist they look so nice because of all the variety!

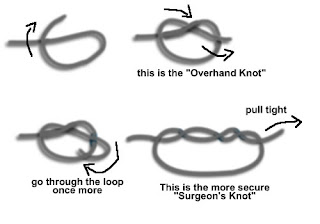
Once you have put on beads, carefully wrap the string around your wrist to make sure you have enough beads to wrap around your whole wrist. Now tie off the ends so that the beads wont come off. I suggest documenting the bead pattern you chose, whether it be with a picture or a sketch, because if your beads fall off for some reason you will want to be able to recreate it (sadly, this happened to me and I had not documented). Once you have tied off one end, move the clip to that end and tie the other, then remove the clip and tie a surgeon's knot to tie the bracelet together.
BeadingTimes.com

Clip the extra cord and try to tuck the knots inside a bead. You are finished! Enjoy wearing or gifting your creations! There are so many possibilities for this project, I hope you have fun beading :)

Friday, March 16, 2012

Foodie Friday: Sweet Popcorn Balls


These sticky-sweet popcorn popcorn balls are such a crowd-pleaser and are infinitely customizable. You can add anything your heart desires! This is a basic recipe that you can build off of (think chocolate chips, sprinkles, whole marshmallows, etc), so use your imagination, or just eat them as is, which is what we did, and they were sweet and fantastic. These are sure to be a hit at your next movie night!

This recipe makes about 15 tennis-ball size popcorn balls, which is a lot more than it sounds!


You will need:
  • 2 large (2.75 oz) bags of microwave Kettlecorn popcorn (or plain)
  • 3/4 cup light corn syrup
  • 1/4 cup butter
  • 1 cup powdered sugar
  • 1 cup mini marshmallows
  • 2 tsp cold water
  • 1/2 tsp cinnamon

  1. Pop popcorn and pour into a large mixing bowl, removing as many kernels as possible
  2. In a saucepan, add corn syrup, butter, sugar, cold water, and marshmallows. Mix together, add cinnamon, and let come to a boil
  3. Allow mixture to cool for 3 minutes. While mixture is sitting, prepare a surface to place formed popcorn balls such as a large piece of wax/freezer paper or a large cutting board
  4. Pour sugar mixture over popcorn and stir with a large spoon or spatula to cover popcorn with sugar mixture
  5. Grease your hands very well with vegetable shortening (I used Crisco), and use your hands to form popcorn balls, packing them tightly
  6. Set completed popcorn balls on your prepared surface ensuring that the popcorn balls are not touching one another
  7. Let sit for 10-15 minutes before serving

Friday, March 9, 2012

Foodie Friday: Stuffed Mushrooms


I looove stuffed mushrooms. They are fantastic. Such a wonderful, like appetizer to so many meals. They are great with pasta especially, and since I eat a lot of pasta I sure do have plenty of excuses for eating stuffed mushrooms!

This recipe was found at Baked Bree and made almost exactly. I hope you enjoy this recipe!

You will need:
  • 12 white mushrooms
  • 4 oz cream cheese, softened
  • 2 cloves garlic
  • 2 tbs breadcrumbs (plain or italian)
  • 2 tbs parsley
  • 1/2 tsp thyme
  • 1/8 cup (2 tbs) white wine
  • 1/8 cup (2 tbs) grated parmesan
  • 1 tbs olive oil
  • Salt & Pepper to taste

  1. Preheat oven to 350F
  2. Do not was your mushrooms off. If you need to wash them, wipe them with a slightly damp cloth. Excess moisture will make your mushrooms slimy
  3. Remove the stems and slightly hollow out your mushroom, saving the bit you removed in a bowl to the side
  4. Finely chop garlic and mushroom and mix together (if you have a food processor, run it through there)
  5. Saute the mushroom and garlic in olive oil over medium-high heat for 5-7 minutes, or until mushrooms begin to caramelize
  6. Add white wine and let it cook out
  7. Remove mushrooms from heat and set to the side
  8. In a separate bowl, mix cream cheese, parmesan, thyme, and parsley
  9. Add mushroom mixture to cream cheese mixture and mix well, adding salt & pepper if desired
  10. Place mushroom caps on foil-lined pan and add filling. It is easiest to do this by filling an icing bag or a ziploc bag with the corner cut and squeezing it in
  11. Sprinkle breadcrumbs on top of filling
  12. Bake for 20 minutes, or until leaking water and hot all the way through
  13. Garnish with more parsley and serve

Friday, March 2, 2012

Foodie Friday: Two-Bite Cheescakes


These delectable two-bite cheesecakes are sinfully easy (and fast) to make. You can have them from the oven to the table in less than hour. Perfect desserts for parties, or for small portions at home. It's much faster to make 12 two-bite cheesecakes then one large one after all! You can top them off with raspberry sauce (as pictured), chocolate shavings, strawberry slices, or just some whipped cream. Why not do a few of each?

This recipe makes 12 two-bite cheesecakes in a standard size muffin pan.

You will need:
  • 1 8oz package of cream cheese, softened
  • 2 eggs
  • 2/3 cup granulated sugar
  • 1 tbs lemon juice
  • 1/2 tsp vanilla
  • 1 graham cracker crust, or 12 vanilla wafers

  1. Preheat oven to 350F
  2. Line a muffin pan with paper liners
  3. Place one vanilla wafer in the bottom of each lined cup as the crust, OR using a spoon loosen a pre-made graham cracker crust and repack about 1 1/2 tbs into the bottom of each lined cup (of course you can crush your own graham crackers too, but I happened to have a graham cracker crust sitting around waiting to be used)
  4. In a medium mixing bowl, beat softened cream cheese until fluffy
  5. Add eggs, sugar, lemon juice, and vanilla and beat together until smooth (if your cream cheese has been beaten well, then this step shouldn't take too long)
  6. Fill each lined cup about 2/3 full with the cream cheese mixture
  7. Bake cheesecake for 15 minutes, or until it no longer jiggles
  8. Let cool in pan for 5 minutes before moving cheesecakes onto wire cooling rack. After cooling on the rack for 10 minutes, cover loosely and move to the refrigerator
  9. Remove from liner and top with sauce, fruit, or whipped cream immediately before serving