Showing posts with label Crafty Tuesday. Show all posts

Tuesday, March 20, 2012

Craft Tuesday: Simple Stretch Bracelets


Bracelet making is probably something we all did when we were little. There are so many great bead options to make fun, fashionable bracelets that it really is worth while to make your own bracelets now! I was on the hunt for some fun, purple beaded bracelets. I hit up all the department stores and Target, and everything I found that I liked was going to cost me at least $30 to have a set. I moped, and then thought to myself, "Duh, you are a crafter. You should MAKE your bracelets!"

So I did.

My inspiration was a set of purple bracelets I saw at Dillard's, where one bracelet was $20. They were made out of very similar purple plastic beads that were "crystal cut." I went to JoAnn and bought a large bag of similar plastic beads (Urban Ice) for $5, a spool of 60' of stretch cord for $4, and a pack of 10 silver-plated beads for $5. After I used some 40% off coupons, I spent less than $10 at the store, and I still have beads and LOTS of cording left over.

So maybe this blog entry is less about teaching you HOW (which I do) and more about making you aware of the money-saving possibilities at your fingertips (which I did)!


To start, measure your wrist using a flexible tape measure or string. Mine was 6.5" around. Add on 4 inches (2" onto each side for tying knots). So my cord was cut to 10.5" long.

Next, use a binder clip or paper clip and clip off the end of the string, leaving the 2" excess. This clip will act as a bead stopper.

Place your string to the side and begin arranging your beads. I first laid mine out and separated them into different shapes and colors. My bag had quite a variety so I had lots of little piles. After you do that, it's time to start choosing your beads!

I am not a big fan of simple patterns like purple, pink, purple, pink, etc so this is how I did mine: I picked on bead to repeat, and did so every 3rd or 4th bead. Next to that bead I put a silver one, and then in between those I just filled in with a fun variety, making sure not to have two similar beads too close together. Simple to do and it looks a little less like Claire's jewelry.


If you are making a set (I made 3), then try to vary the sizes of beads you use by bracelet. I made one using the large beads, one using large & medium beads, and one bracelet using only the small beads. When they are stacked on my wrist they look so nice because of all the variety!

Once you have put on beads, carefully wrap the string around your wrist to make sure you have enough beads to wrap around your whole wrist. Now tie off the ends so that the beads wont come off. I suggest documenting the bead pattern you chose, whether it be with a picture or a sketch, because if your beads fall off for some reason you will want to be able to recreate it (sadly, this happened to me and I had not documented). Once you have tied off one end, move the clip to that end and tie the other, then remove the clip and tie a surgeon's knot to tie the bracelet together.

BeadingTimes.com

Clip the extra cord and try to tuck the knots inside a bead. You are finished! Enjoy wearing or gifting your creations! There are so many possibilities for this project, I hope you have fun beading :)

Monday, February 13, 2012

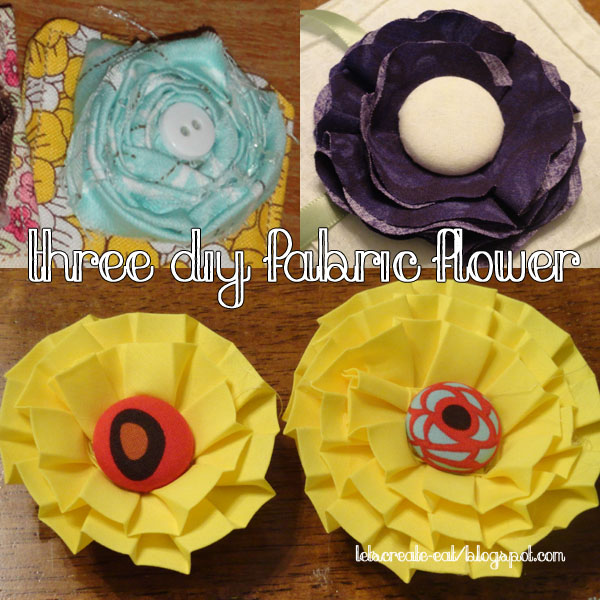
Craft Tuesday: Three DIY Cloth Flowers


We're back this Craft Tuesday with a simple craft, well 3 simple crafts really. These cloth flowers can be used to embellish many things. One of them you will recognize from my cloth bookmarks! You can stick these flowers onto headbands, brooch pins, hair clips, book covers, aprons... the list is as long as your imagination is big!

You will need:
  • Hot glue gun (or fast-drying fabric glue)
  • Various fabrics

Two of these flowers can be made with any cloth scraps you have laying around, so we will start with those.


Flower #1: The Rolled Flower
Start by cutting one long strip of fabric (at least 30", the longer the strip, the bigger your flower), about 1/2" to 1" wide. On one end of the fabric strip tie a double knot. This knot will the center of your flower.

Now, with one hand (not your dominant hand) hold the knot and with the other hand begin twisting the fabric (the way you would twirl a lock of hair, so that is curls onto itself). As you twist the fabric, begin wrapping it around the knot with your other. It takes a bit of  doing and I had to kind of go back and forth using both hands for each task. As you are wrapping, place glue about every 1/2" or so to make sure the flower stays together. When your flower reaches the desired size, take the end of your fabric strip and glue it (unrolled) onto the bottom of the flower.

Finish the flower with a button of your choice in the center (sewn or glued). If you're placing this on a head band or a pin, glue the flower onto a felt circle a little bit smaller than the flower, and then glue the headband/pin onto the felt.


Flower #2: The Flower with Petals
You will need to cut out 8 circles of the same size. My circles were about 2 1/2" wide. However big you want your flower to be, that's how big you should make your circles. After all of your circles are cut out you can do one of two things: 1) You can leave the circles with smooth edges and your flower will look very uniform and smooth. 2) You can fold your flowers in half or in fourths and trim the edges a little to give them some interest (pictured top left). As you are attaching them later, you can refold them so that the edges do not line up and it gives the illusion of more petals.

Now that your petals are cut out, cut out a circle of felt in a similar color to your fabric (or the background it will be going on), making the circle about 1/2" smaller than your flower. Fold one of your petals twice, so it looks like a slice of pie, and glue it so it stays in that shape, and then glue it onto the felt circle, with the point in the center of the circle. Repeat this 3 times so that you have four petals glued onto the circle (pictured top right). Glue down three more petals in the same fashion on top of the bottom four, covering as many "seams" between the petals as you can (pictured bottom left). Next, take one circle and fold it in half. Pull the two corners in towards each other so that the half circle folds up just a little. Glue this petal down and then attach a button on top (sewn or glued). For this flower, I used an upholstery button so that I could cover it with a corresponding fabric. These buttons can be found in the upholstery section of most craft stores in several different sizes.


Flower #3: The Pleated Flower
This flower uses pleated ribbon that you will find at any fabric/craft store in the ribbon by the yard area. It comes in many different colors, but is typically a stiff cotton, although you can find some cotton-sateen ones once in a blue moon at a regular craft store (at least around me it's a rarity). This is probably the simplest of the flowers. Start with one long piece (about 2') and glue down a thin fold of fabric at one end. Now begin make a circle with the pleated ribbon, gluing every 1/2" or so to ensure the ribbon does not unwind. Continue in this manner until your flower is the size you want it to be. When your flower reaches the desired size, take the end of your ribbon and glue it onto the bottom of the flower.

If you are going to attach it to a headband, pin, etc, glue a circle of felt on the bottom. Finish your flower off with a button. I used an upholstery button covered in one of my fabric scraps. I love using upholstery buttons because they are customizable. These buttons can be found in the upholstery section of most craft stores in several different sizes.

Tuesday, January 31, 2012

Craft Tuesday: Felt Fortune Cookies


I found this ADORABLE idea on the Martha Stewart website and just had to try it. It is such a unique idea for Valentine's day, and it takes no time at all! This is perfect to make a bunch for that one special person, or one for a bunch of special people! You can stuff these with handwritten or printed "fortunes" or candies (Hershey's kisses fit perfectly).

You will need:
  • Felt (one pre-cut sheet makes 2 cookies)
  • Floral wire
  • Scissors
  • 4 1/2" circle to trace (or an adjustable circle cutter)
  • Hot glue gun
  • Stuffers (candy, fortunes, etc)

Start by cutting one 4 1/2" circle of felt for every cookie you want to make. Then, cut strips of felt that are about 4" long and 1/3" wide. Also cut floral wire in pieces that are a little smaller than your felt strips (so about 3.75").


Place the floral wire in the center of your circle, on the line where the fold will be. Place a line of hot glue over it, going a little over each end. Place your felt strip on top of the floral wire and allow glue to cool.


Next, fold your felt in half so that the felt strip covering the floral wire is on the inside and hidden. Now bend the two corners away from the curved side of the half circle, pinching them together to create the fortune cookie shape.


Fold up one of the cookie flaps and stuff your fortune cookie with fortunes, candy, etc. Fold your cookie back over and adjust. Now repeat until you have made all of your cookies!


See, that was pretty simple huh?

Happy early Valentine's Day!

Tuesday, January 24, 2012

Craft Tuesday: Danish Heart Baskets


These beautiful heart baskets are simple to make and, even though they are a Danish Christmas tradition, they are now used for many different things. This year, I am making some to give as Valentine's Day presents! They are perfect to stuff with candy, cookies, or small presents. The baskets are so simple to make, it would be a great thing to make with children to give to their friends!

I made my baskets out of felt, but you can use paper too. Don't limit yourself to solid colors either! If you are doing paper, try different patterns of paper, or even something fun like an old map or sheet music.

You will need:
  • Felt or paper
  • Scissors
  • Ruler

The first thing you need to do is cut your material. You will need two 9" x 3" strips for each heart.


After you cut your strips, fold each one in half and round the corners. Then, make three cuts from the folded end, up towards the open end. Leave about a 1.5" gap between the end of the felt and your cut. It's easiest to start with the middle cut, and then doing the outer two.


Once your pieces are cut, you can weave them together. It's simple! Take your first strip from one piece of your heart weave it in the strips of the other piece. Go around, then through, around then through. Weave each strip in this manner, alternating how you start. For example, for strips 1 and 3 you would start weaving buy going around, and for 2 and 4 you would start by going through. Hopefully that makes sense!


Now that you have finished weaving them, adjust them and make the pretty! Stuff them and give them as a gift, or hang them on a garland.

Happy crafting!

Tuesday, January 17, 2012

Craft Tuesday: T-Shirt Scarves


I have some old t-shirts that are super soft and wonderful colors, and I have had a very difficult time with the idea of parting with them. I was so excited to do this craft because it meant I could keep, and even wear, these wonderful t-shirts! No more trash bin for them. Hooray for repurposing!


This craft is super simple, and not too time consuming either. It cost me absolutely nothing because all you need in a pair of scissors and some old t-shirts. This is such a great no-sew scarf. Even kids can do this project, and if you use an adult size shirt for a kid's scarf you will be able to wrap it several times! If you want a big one for yourself, use an extra-large men's shirt. Heck, you could even buy a cheap shirt to make this with if you really wanted to. I love this craft!

You will need:
  • 2 old shirts (colors that go well together preferably)
  • Scissors


Start by laying your shirt out straight and cutting off the bottom hem.


Next, begin cutting your shirt in strips about half an inch thick. I got about 12 strips from each shirt and stopped, but I could have kept going for a fuller scarf. Once you have all your strips (which are really loops because you will not cut the seams on the edge) hold a side in each hand and stretch the loops out so that the fabric pulls and curls up on itself (see below).


I decided that I would mix the two different colors together in each scarf piece. Of course, you can also keep them separate and have one piece is that is all one color and one that is another. Whichever suits you best, but the rest of the direction are specific to how I did mine. They're easy to alter if you are doing a single color.

Next, remove two loops from each color and place to the side. I did two because my shirts had a seam on each side. If you shirt has one or no seams you only need one loop. Next, divide each color in half and mix it up with a half of the opposite color. Group any seams together because you will be covering them up next.


Now, take those 4 loops (or 2) you put to the side and cut one end so it becomes one long piece of fabric. Place the center of this strip of fabric at the base of the grouping of seams and wrap one end around it, then the other, until the seams are covered. Use one color of fabric for the knotting on one scarf, and the other color for the other scarf.


Knot these two ends back together, trim off all about about 1/2" of excess and tuck that into the wrapped cloth.


Now, repeat for all the seams, and wrap it around your neck however you like. I doubled both of mine and just pulled and fiddled with them until I got them just right. You can also try simply knotting them together and making one loose scarf. Lovely! So simple. I hope you enjoy making and wearing this scarf!

Tuesday, January 10, 2012

Craft Tuesday: Cloth Bookmark

 
This cloth bookmark is sweet, simple, and a great package topper. This would be a wonderful present for friends and family for Valentine's Day. It's a great project to do with fun fabric from the remnants bin at the craft store or with scraps you have at home! I made a couple and gave them to my sister and my best friend and they loved them! I have already decided to make more for some other wonderful people.

I originally stumbled upon this when I was looking for some kind of cute way to embellish a cloth bookmark on Pinterest. I found Little Birdie Secrets' how-to suggesting them as a teacher gift. What a great idea!

These do require sewing, but it is really very little, very simple sewing. Cutting out, sewing, and assembling each bookmark probably took me about 45 minutes. A big chunk of the time was spent making the cloth flower though.

You will need:
  • 2 coordinating pieces of cloth
  • Featherweight fusible interfacing
  • One button
  • Thread
  • Scissors
  • Hot glue gun

Start by choosing the fabric you would like to make your bookmark and which you would like to be the flower. Cut a 4.5x8" piece of the bookmark pattern. Cut the same size of fusible interfacing and follow the directions that came with your interfacing to attach the two together. Trim any excess fabric or interfacing from the edges. It's okay if you have to trim a bit off, I have made the fabric size a little larger with this in mind.


Fold your fabric in half, interfacing side out and fabric in. Now, using any color thread, sew the bookmark together using standard 3/8" seam size. Sew the bookmark up, leaving one short end open and the edge perpendicular to it should be sewn until about 1/4" to the open end. After you sew the bookmark (don't forget to backstitch!), clip the corner and turn the bookmark right side out through the short end you left unstitched.

Now it's time to press your bookmark and prepare to do a topstitch, which will close up the end you left open. When you press your bookmark, turn in the fabric on the open end about 1/4". Pressing the fabric down will mean that you don't need to pin in, which would be difficult with such a small piece. Plus, it will make the edge much cleaner! After pressing your bookmark, put a topstitch on it. If you want to use a decorative stitch, feel free too. This topstitch is mostly decorative except for the small part where it seals the end.


Hooray! You made the bookmark. Now time for the flower to go on top. Plug in your hot glue gun to heat up! Next, take a piece of fabric, folded in half (like it is right off the bolt, with the two rough ends together) and cut a strip about 1/2" wide right off the end, from the fold down to the rough edge. Unfold. At one end, tie a knot, and place a dab of glue on it. Begin twisting the fabric and wrapping the twisted fabric around the knot. I wrapped mine very tightly, doing a dab of glue every 1/2" or so. Experiment with how tight or loose you want to make the fabric for the flower. Once the flower is the size you would like, or when you only have about 1" of fabric left, take the spare fabric and hot glue it on to the bottom of the flower. Doing this will keep your flower from unraveling or losing its shape, so don't be afraid to put a fair amount of glue (as long as it doesn't seep out of the sides).

Next, you have the option of hot gluing your button down to the center of the flower, or hand-sewing it through the center. On the bookmark with the brown flower, I sewed the button on (you can see the thread). On the bookmark with the blue flower, I glued it on (no thread). Other then the visible thread there was no big difference, other than that the sewn on button is less likely to fall off. After you attached your button, hot glue your flower to your bookmark with a circle of glue and you are finished.


Whether you are making this for yourself or a loved one, I hope you have fun!

Tuesday, December 27, 2011

Craft Tuesday: Tackling Crayon Art


This project was fun. Awesome, super fun. Almost therapeutic because of the simplicity of it all, and all the colors are just so crazy and cool.

Alright, so I have seen this crayon art ALL over Pinterest. It is awesome and everyone wants to do it. There are two methods to do doing it that I know of: 1)Hot glue the peeled crayons and use a blow dryer to melt them. 2)Run crayons through your hot glue gun.

My friend Brittnee and I decide to tackle this project together, in a two-part adventure. This is part-one. We opted to try the hot glue gun method first because we figured it would give us more control over the colors and where we place them. Plus, at the end we wouldn't have crayon chunks hot glued onto our canvases.

Well, it didn't go as smoothly as we thought and I definitely have some suggestions for you if you are going to try the hot glue method. First of all, use a new glue gun (or a glue gun with no glue in it) that you are using ONLY for crayons, because this WILL get messy and you will probably never be able to use your glue gun for regular gluing again (unless you really, really clean it well). I bought a new hot glue gun the day after I did this project. I will probably be able to salvage my other one, but I use mine for LOTS of stuff, and I need nice, clean one for all the other projects I do. Second, you really have to test out the waters to see what heat setting you want to use and how your glue gun will be most effective when it comes to pushing these crayons through.

Wax melting out the side means burnt fingers :(

Our biggest problem was that my glue gun wouldn't "grab" onto the crayons to push them through, so we had to push them through with another crayon. Then the wax ended up melting out the side AND through the glue gun hole, so it was a little...leaky. This got messy and frustrating. Perhaps if you use a glue gun that uses the small glue sticks this problem would be solved. If you are buying a cheap little glue gun specifically for this project (which is not a bad idea at all) then I would recommend you try that kind.

Okay, now that I have told you all the ways that ours was difficult let me show you how awesome, and INCREDIBLY FUN this project was. Seriously. Most fun I have had doing a craft in a while. Of course, it could be because I had company this time!

You will need:
  • Crayons. Lots of crayons
  • Hot glue gun (that you are willing to part ways with)
  • Canvas(es)
  • Heavy drop cloth you don't mind getting melted wax on
  • Patience

We had two 7x14" canvases. The first canvas we used as an experiment canvas. We tested the different ways the wax melted and got used to "waxing." Of course, you could use a heavy piece of cardstock or cardboard to practice on, but our canvas came in a two-pack, so we figured, why not?


By laying the canvas flat and holding the gun perpendicular we were able to achieve a very cool splatter look. It was fun and stress relieving to just have at it. Then of course, we messed up our awesome painting by experimenting with the dripping effect, which is what we all see and love all over the internet (especially Pinterest).

While holding the canvas at various angles (we laid the end of the canvas on top of our upright crayon box) and pushing the crayon wax out at the top end of the canvas, we got that sought-after drip look. Hooray!

Now that we knew our way around this project, it was time to start the second canvas. Our goal was to create a tree - a weeping willow to be exact.

First, we used a light blue crayon to quickly mark of which areas we wanted to be background, tree trunk, and branches. We used several shades of blue in the splatter technique to create the background, a sky actually. While that wax was still hot we used a blue crayon and spread it out and mixed it up. Ended up pretty neat I think.


Next we began the tree trunk. Using about 8 crayons in various shades of brown we ran the crayon through the gun, moving it from side to side of the designated trunk space. When we had finished with all of the crayons, I used the hot tip of the hot glue gun to "carve" a heart in my tree trunk. Using the tip of the gun to remelt the wax is a great trick. If you have a big clump somewhere and you want to break it up, that's a great way to go about it.

Next, we flipped the canvas over so that the other end of the canvas was now propped up. We began dripping the greens out next so that the wax dripped towards the tree trunk. It took me about 2 crayons of green to flush all the brown out and then on top of that I used about 4 more. In other words, every single green and brown crayon went into this piece, and several of the blues too. Of course, we could have chosen to do reds & oranges and made the tree an autumn tree. (Hmm. Maybe I'll do that for my next one!) I tried to fill in as much of the white space as possible, but wasn't able to.


All in all, we were very pleased with how this crayon art (or "waxing") turned out. Though I burned my finger on hot wax, I think it was well worth it!

If you do attempt this, please be careful not to burn yourself and make sure you have something to protect the surface you are working on. Wax does come up, but this wax is HOT and could do heat damage.

Tuesday, December 20, 2011

Craft Tuesday: Wrapping Paper Collage


Every year for Christmas I spend money on beautiful wrapping paper only to see it used and thrown away without ever capturing how pretty it was under our tree. Not anymore! Here is a wonderful way for you to remember the excitement of Christmas morning- a wrapping paper collage!

By Mod Podging squares of the wrapping paper you use each year onto a hefty sheet of paper or cardboard, and then placing a picture from Christmas morning on top, you can create a great piece of wall art for the holidays (or a scrapbook page).

Left: Blue reindeer, lightweight "cheap" paper wrinkled
Right: Brown and silver, heavier paper did not wrinkle
After doing this one myself, I found that the heavier the paper the better, because it won't wrinkle up when the Mod Podge is applied. From a distance though, the wrinkles are not noticeable. On the same note, my square hole punch wouldn't punch through the foiled paper, and I had to cut it by hand. Also, I would suggest tracing out the bottom line of each row of wrapping paper, otherwise your lines may tilt a little, like mine. Of course, that's all in the charm of a hand made craft!

You will need:
  • 1 12x12 piece of card stock or cardboard
  • 1 square hole punch (I used a 3" diagonal square hole punch)
  • 1 photograph
  • Black cardstock/scrapbooking paper
  • Stickers of your choice
  • Glossy Mod Podge
  • Wrapping paper scraps
  • Sponge brush

Begin by gathering up some wrapping paper scraps. You will need to punch several squares out of each sheet. I used a total of 25 squares (5 squares by 5 squares, each square measuring a little over 2"), and punched about 28 squares to choose from.


Once you have all of your squares punched, play with them and arrange them in a way that you like! This took me a few minutes and a lot of moving around, right until I had almost every square back at their starting point, until I was pleased with the arrangement!


Then make a stack for each row to keep them in order as you proceed to glue them down. Doing one row at a time, apply a thin coat of Mod Podge and then lay your wrapping paper squares down. Your Mod Podge may dry before you get to lay down the last square or two, so reapply the Mod Podge before you lay those squares down.


After you have Mod Podged all of your squares, glue down any loose corners and let dry completely. This shouldn't take more than 10 minutes, max. Now, apply one or two thick coats of Mod Podge on top to seal the squares down and give your collage a nice finished look.


While this top coat dries, glue your picture to the black sheet of paper, leaving a quarter inch border around the edge.  On another piece of black paper, use stickers to write the year or your family name. Trim to size. Once the Mod Podge is dry, trim off any excess paper and glue down the black papers with craft glue, or a little bit more Mod Podge. Do not Mod Podge over this layer.

Now you can frame your wrapping paper collage, put it in your scrapbook, or keep it somewhere special for you to look back on whenever you like.

Tuesday, December 13, 2011

Craft Tuesday: Canvas Christmas Gift Bags


Every year we buy gift bags that end up getting wrinkled up, torn, and thrown away after a few years of use. How about this year we make something that is personal, and reusable for many, many, many years to come? Using the same technique of creating a freezer paper stencil, ironing it on, and painting that I used when I created the Halloween canvas bag, you can make adorable gift bags that people will cherish as much as the gift it contains (if not more!).

I painted four 5x6" bags to give people small gifts (candy, gift cards, ornaments, etc) because when a gift is so small, I try to make it as special as possible!

In case you don't remember how to do the stenciling, this DIY contains a brief refresher!

You will need:
  • Canvas/cloth bag(s)
  • Fabric paint (Soft paint if my preference)
  • Freezer paper
  • Iron
  • Sponge brush
  • Pencil
  • Scissors

Start by cutting pieces of freezer paper to the size of your bags. Once you decide what you want your design to be, you can draw it and cut it out. Here are the designs I did and how I did them. Feel free to copy my ideas, or discard them completely!

Design #1: Snowflake


Draw a circle, or use a large circle cutter, and cut out a large circle from the piece of freezer paper you already cut to size. Fold this circle in half, then in half again, so you have a piece that resembles a slice of pie. Now cut it up just the way you did when you make coffee filter snow flakes in elementary school! I unfolded mine once or twice in the middle of cutting to see what I was doing, and how to improve it. I am not a very experienced snowflake maker, so I had to.


When you are all done, iron your stencil on, paint over your stencil. Your snowflake will be the color of your bag and the bag will be whatever color your choose. Then remove the stencil and let it dry. If you are doing a large bag, cut several (3 or 5) different size circles and make multiple snowflakes to use as stencils. Let dry according to the directions on the paint bottle before using as gift bag.

Design #2: Christmas Tree


Fold your cut freezer paper piece in half and then unfold it. Against the fold, draw half of a Christmas tree. Refold it and cut it out. Unfold and you have a perfectly symmetrical, perfectly centered tree! Hooray!


Iron stencil on, paint in the tree-shaped hole, and remove stencil. Let dry for about 30 minutes and then decorate your tree. I used a pencil eraser dipped in paint (and dabbed on a napkin to remove excess paint) to create the ornaments and "star" on top of the tree. Simple. Let dry according to the directions on the paint bottle before using as gift bag.


Design #3: Snowman


Draw a circle, or use a circle cutter, and cut out a large circle from the piece of freezer paper you already cut to size. This will be the shape of your snowman's head. Just like with the snowflake, you will be painting around the stencil, painting the background, leaving the snowman's head the color of the bag. Of course, if you are using a colored bag and want to paint the snowman's head white, then still cut out the circle, just iron on the piece of freezer paper with the hole in it. Iron on stencil, paint, peel off, and move on to the snowman's face. I used the non-cap end of a Crayola marker as my stamp for the snowman's eyes and mouth. Dip it in the paint and dab off the excess paint on a napkin before stamping it on. Use the tip of your foam brush to create the nose (you might want to practice before doing it on the bag itself). Let dry according to the directions on the paint bottle before using as gift bag.


Design #4: Ornament


Using the same piece of paper I used for the snowman stencil, I created the ornament. While I used the circle that I removed for the snowman head, I used the paper that the circle was removed from for the ornament shape. Iron on the sheet of freezer paper with a big hole in it, paint, remove the stencil, and let dry for 30 minutes before decorating your ornament. I used a small circle (marker cap) to create a ring of circles on the ornament and then free handed the ornament top. Let dry according to the directions on the paint bottle before using as gift bag.


In case you were wondering, here is the before and after decoration. A little bit really does go a long way!


Phew. That was fun! I can't wait to give them away filled with fun goodies!
Merry Christmas and happy crafting!