Showing posts with label Foodie Friday. Show all posts

Friday, March 16, 2012

Foodie Friday: Sweet Popcorn Balls


These sticky-sweet popcorn popcorn balls are such a crowd-pleaser and are infinitely customizable. You can add anything your heart desires! This is a basic recipe that you can build off of (think chocolate chips, sprinkles, whole marshmallows, etc), so use your imagination, or just eat them as is, which is what we did, and they were sweet and fantastic. These are sure to be a hit at your next movie night!

This recipe makes about 15 tennis-ball size popcorn balls, which is a lot more than it sounds!


You will need:
  • 2 large (2.75 oz) bags of microwave Kettlecorn popcorn (or plain)
  • 3/4 cup light corn syrup
  • 1/4 cup butter
  • 1 cup powdered sugar
  • 1 cup mini marshmallows
  • 2 tsp cold water
  • 1/2 tsp cinnamon

  1. Pop popcorn and pour into a large mixing bowl, removing as many kernels as possible
  2. In a saucepan, add corn syrup, butter, sugar, cold water, and marshmallows. Mix together, add cinnamon, and let come to a boil
  3. Allow mixture to cool for 3 minutes. While mixture is sitting, prepare a surface to place formed popcorn balls such as a large piece of wax/freezer paper or a large cutting board
  4. Pour sugar mixture over popcorn and stir with a large spoon or spatula to cover popcorn with sugar mixture
  5. Grease your hands very well with vegetable shortening (I used Crisco), and use your hands to form popcorn balls, packing them tightly
  6. Set completed popcorn balls on your prepared surface ensuring that the popcorn balls are not touching one another
  7. Let sit for 10-15 minutes before serving

Friday, March 9, 2012

Foodie Friday: Stuffed Mushrooms


I looove stuffed mushrooms. They are fantastic. Such a wonderful, like appetizer to so many meals. They are great with pasta especially, and since I eat a lot of pasta I sure do have plenty of excuses for eating stuffed mushrooms!

This recipe was found at Baked Bree and made almost exactly. I hope you enjoy this recipe!

You will need:
  • 12 white mushrooms
  • 4 oz cream cheese, softened
  • 2 cloves garlic
  • 2 tbs breadcrumbs (plain or italian)
  • 2 tbs parsley
  • 1/2 tsp thyme
  • 1/8 cup (2 tbs) white wine
  • 1/8 cup (2 tbs) grated parmesan
  • 1 tbs olive oil
  • Salt & Pepper to taste

  1. Preheat oven to 350F
  2. Do not was your mushrooms off. If you need to wash them, wipe them with a slightly damp cloth. Excess moisture will make your mushrooms slimy
  3. Remove the stems and slightly hollow out your mushroom, saving the bit you removed in a bowl to the side
  4. Finely chop garlic and mushroom and mix together (if you have a food processor, run it through there)
  5. Saute the mushroom and garlic in olive oil over medium-high heat for 5-7 minutes, or until mushrooms begin to caramelize
  6. Add white wine and let it cook out
  7. Remove mushrooms from heat and set to the side
  8. In a separate bowl, mix cream cheese, parmesan, thyme, and parsley
  9. Add mushroom mixture to cream cheese mixture and mix well, adding salt & pepper if desired
  10. Place mushroom caps on foil-lined pan and add filling. It is easiest to do this by filling an icing bag or a ziploc bag with the corner cut and squeezing it in
  11. Sprinkle breadcrumbs on top of filling
  12. Bake for 20 minutes, or until leaking water and hot all the way through
  13. Garnish with more parsley and serve

Friday, March 2, 2012

Foodie Friday: Two-Bite Cheescakes


These delectable two-bite cheesecakes are sinfully easy (and fast) to make. You can have them from the oven to the table in less than hour. Perfect desserts for parties, or for small portions at home. It's much faster to make 12 two-bite cheesecakes then one large one after all! You can top them off with raspberry sauce (as pictured), chocolate shavings, strawberry slices, or just some whipped cream. Why not do a few of each?

This recipe makes 12 two-bite cheesecakes in a standard size muffin pan.

You will need:
  • 1 8oz package of cream cheese, softened
  • 2 eggs
  • 2/3 cup granulated sugar
  • 1 tbs lemon juice
  • 1/2 tsp vanilla
  • 1 graham cracker crust, or 12 vanilla wafers

  1. Preheat oven to 350F
  2. Line a muffin pan with paper liners
  3. Place one vanilla wafer in the bottom of each lined cup as the crust, OR using a spoon loosen a pre-made graham cracker crust and repack about 1 1/2 tbs into the bottom of each lined cup (of course you can crush your own graham crackers too, but I happened to have a graham cracker crust sitting around waiting to be used)
  4. In a medium mixing bowl, beat softened cream cheese until fluffy
  5. Add eggs, sugar, lemon juice, and vanilla and beat together until smooth (if your cream cheese has been beaten well, then this step shouldn't take too long)
  6. Fill each lined cup about 2/3 full with the cream cheese mixture
  7. Bake cheesecake for 15 minutes, or until it no longer jiggles
  8. Let cool in pan for 5 minutes before moving cheesecakes onto wire cooling rack. After cooling on the rack for 10 minutes, cover loosely and move to the refrigerator
  9. Remove from liner and top with sauce, fruit, or whipped cream immediately before serving

Friday, February 24, 2012

Foodie Friday: Baked Chicken Enchilada Casserole


This recipe was my grandmother's. It's a very simple baked casserole that is perfect to make for dinner tonight, or to make and refrigerate for the next day! You can add whatever you like (cilantro, cayenne, corn, maybe even onions if you're not allergic like I am!) but as is this is a festive and delicious dinner. Serve with a side of taco salad and corn!

This recipe make 6 large servings.

You will need:
  • 2-3 boneless, skinless chicken breasts
  • 4 cups tortilla chips or tortillas1 16oz can diced tomatoes
  • 1 4-oz can chopped green chiles
  • 1 cup chicken broth
  • 1 cup (8 oz) grated cheese
  • 1 tsp chili powder
  • 1/4 tsp black pepper


1.     Boil chicken breasts, reserving 1 cup broth
2.     In pot, mix broth, diced tomatoes (drained), spices, and green chiles over low heat
3.     Preheat oven to 350 degrees Fahrenheit
4.     Cover bottom of casserole dish with small amount of spiced mixture, then half of the chips/tortillas
5.     Layer half of the chicken over the chips
6.     Pour half the sauce over the chicken
7.     Sprinkle 4oz grated cheese on top
8.     Repeat steps 4-7 once
9.     Bake for 25-30 minutes and let cool for 5-10 minutes before serving

Hint: Cover for the first 10 minutes of baking to prevent burnt cheese

Friday, February 17, 2012

Gluten-Free Peanut Butter Kiss Cookies


These flourless, 3 ingredient cookies (4 if you include the Kiss) were the perfect thing for my cookie craving one day when I was running low on all purpose flour (why I had little flour and a whole bag of Hershey's Kisses I may never fully understand). It's incredibly easy to substitute the sugar with Splenda or another sugar replacement for a lower calorie count–about 50 calories less per cookie. Yup. I did the math.

This recipe makes approximately 18 cookies

You will need:
  • 1 cup creamy peanut butter
  • 1 cup sugar (or Splenda)
  • 1 egg
  • 18 Hershey's Kisses

  1. Preheat oven to 350F
  2. Beat sugar, peanut butter, and egg until fully incorporated. Here's a helpful tip for measuring peanut butter. Use a 2 cup measuring cup and fill it with one cup of water. Add peanut butter until the water line moves up to 2 cups. Now you can scoop out your peanut butter without having a sticky measuring cup!
  3. Roll your dough into 1" balls and place on ungreased baking sheet
  4. Bake for 10 minutes
  5. While cookies are baking, unwrap one Hershey Kiss per cookie and place to the side
  6. After the cookies are taken out of the oven, promptly and gently press a kiss into each cookie
  7. Let cool completely before eating. The kisses may remain melty and gooey (yum!) for several hours, so if you want cooled candy make sure you make the cookies at least 6 hours in advance.

Enjoy this delicious treat and try not to eat them all in one sitting!

Friday, February 10, 2012

Foodie Friday: Fast Potato Soup

 
Potato soup is delicious, warm, and such a great comfort food.  This recipe is fast and simple. There is no need to peel and slice potatoes, because it is made with one packet of Idahoan mashed potato mix! To make it even easier you can use the bacon bits you buy to put on salads. May not taste exactly the same, but it's pretty close!

This recipe makes 2-4 servings. Jason and I split one batch and had lunch. If you are serving it as a side with a sandwich or as an appetizer then this recipe will easily serve 4.

You will need:
  • 1 packet Idahoan Buttery mashed potatoes (or regular, and you can add butter)
  • 2 strips of bacon
  • 1 1/2 cups milk
  • 1 + 1/2 cup water
  • 1/2 chicken bullion cube
  • 1/2 tablespoon parsley
  • 1/2 teaspoon sage
  • 1/4 teaspoon oregano
  • Salt & pepper
  • Shredded cheddar cheese

  1. Combine 1 cup water and 1/2 bullion cube in a medium saucepan over medium heat. If you don't have any bullion cubes, feel free to skip this step or use chicken broth, though the flavor won't be exactly the same
  2. While chicken stock is cooking, begin making bacon in frying pan
  3. Once the stock is complete, add milk
  4. Next add parsley, sage, and oregano. Add salt and pepper to taste
  5. Chop cooked bacon strips into small pieces and add half to the milk mixture
  6. Stir well until milk and seasonings are well mixed
  7. Bring just to a boil, stirring frequently to prevent scalding
  8. Add one packet of mashed potato mix and stir in
  9. Add warm water until desired consistency is reached (a little less than 1/2 cup)
  10. Whisk until most of the potato clumps are gone
  11. Serve immediately and garnish with cheddar cheese, parsley, and the remainder of the chopped bacon 


 Serve with some warm bread for dipping! Enjoy!

Friday, February 3, 2012

Foodie Friday: Simple Apple Cinnamon Cupcakes & Praline Icing


Jason and I were sitting around sewing one night. We had eaten an early dinner, so I wanted to make a cake. I had a Betty Crocker Classic Yellow cake mix, but that just didn't sound great. We wanted more than just yellow cake. So, I improvised and came up with this DELICIOUS, and super easy, apple cinnamon cake. It was perfect for our cozy night in, but I am pretty sure I am going to make it as loaves for gifts next fall.

This recipe makes 2 dozen cupcakes, or 1 dozen cupcakes and two small loaves, or 2 large loaves (I think).

You will need:
  • 1 Classic Yellow Cake mix, and the ingredients for which it calls (minus the oil)
  • Applesauce (same amount of oil for which the cake recipe calls, probably 1/2 cup)
  • 2 tsp cinnamon
  • 1 tsp nutmeg
  • 1 peeled & diced apple (Gala)

  1. Preheat oven as directed on your cake mix box (most likely 350)
  2. Pour your cake mix and water/milk and eggs into large bowl
  3. Add applesauce, cinnamon, and nutmeg to cake mix and beat together
  4. Peel and dice apple and add to cake mix. Beat until incorporated
  5. Pour your batter into your greased container(s) and bake as directed on box. Let cool completely before icing
Fresh out of the oven!


For the icing, you will need:
  • 1 cup powdered sugar
  • 1/2 cup packed light brown sugar
  • 1/4 cup butter (1/2 stick)
  • 3 tbs milk
  • 1 tsp vanilla extract
  1. In a small saucepan, bring brown sugar, butter, and milk to a boil over medium heat, whisking constantly
  2. Allow to boil for 1 minute, whisking constantly, and then remove from heat
  3. Whisk in vanilla
  4. Whisk in powdered sugar in 3-4 parts. In order for sugar to fully incorporate, you may have to put your icing back over the lowest heat setting
  5. Place cooled cake on serving plate and pour warm icing over. If you are icing multiple loaves, place loaves on wax paper before pouring icing. Serve immediately

    Friday, January 27, 2012

    Foodie Friday: Squash & Zucchini Parmesan


    Every week I have a couple of friends over to watch a few of our favorite TV shows. I usually cook dinner as well, which can be a challenge because my best friend is a vegetarian, and everyone else sure loves their meat (we are from Texas, after all). This recipe was something I whipped up that everyone seemed to really enjoy. Even though not everyone liked squash or zucchini, they all seemed to love it served up as the classic Italian Parmesan dish. Best part is that it is pretty simple, especially if you use the pre-sliced, frozen veggies.

    This recipe will make 4-6 servings.

    You will need:
    • 1 small yellow squash
    • 1 small zucchini
    • 1 egg
    • 1 cup flour
    • 1 1/2 cups plain bread crumbs (I always prefer Panko)
    • 1 1/2 cups + 1 of your favorite spaghetti sauce
    • 1 cup grated Parmesan
    • Pasta of your choice (spaghetti or vermicelli are my favorites)

    Before baked
    1. Preheat oven to 350 F
    2. Wash and slice your squash and zucchini into 1/4" slices. Or, thaw your presliced squash and zucchini
    3. Beat egg in a small bowl, and pour flour into a shallow bowl and breadcrumbs onto a small plate
    4. Coat the bottom of a greased 9x13 or similar baking dish with a thin layer of sauce (about 1/2 cup)
    5. Dip one piece of squash/zucchini into the flour and coat fully, then dip into the egg, and lastly coat with breadcrumbs
    6. In a frying pan, heat up a little bit of oil and brown your squash piece on both sides (about 1 minute on each side)
    7. Place this piece into the baking dish, and repeat until all of your squash and zucchini are breaded or your pan is full
      After baked
    8. Coat the squash and zucchini with the remaining pasta sauce (about 1 cup), and then sprinkle grated parmesan on top
    9. Baking uncovered for 15-20 minutes, or until the cheese is golden and bubbling
    10. While baking, boil your pasta and heat up the remaining sauce (feel free to make more or less than the recommended 1 cup)
    11. Serve the baked squash over a bed of pasta and sauce

    Friday, January 20, 2012

    Foodie Friday: Nutella Cookies


    I love Nutella, and the idea of Nutella cookies seems just delightful to me. I looked around for a recipe and just decided to try a really simple one I found on Pinterest. The modifications I did are totally optional, and I just did them to make the cookies stay soft, and not harden by the next day. So hopefully you like chocolate, because to me these cookies taste chocolatey and then have a bit of a hazelnut/Nutella after taste. Delicious!

    This recipe makes 24 small cookies, or about 15 regular cookies.

    You will need:
    • 1 cup of Nutella (I used a whole 13oz tub)
    • 1 cup all purpose flour
    • 1/2 cup granulated sugar (or 1/4 cup light brown sugar, 1/4 cup granulated sugar)
    • 1 egg
    • 1 tsp corn starch (opt, keeps your cookie soft)
    • Chopped hazelnuts (opt, not pictured)
    • Milk chocolate chips (opt, not pictured)

    1. Preheat oven to 350
    2. Mix all dry ingredients together in large mixing bowl
    3. Beat in egg and Nutella, and any hazelnuts or chocolate chips
    4. The mixture will be dry and crumbly. Dig in with your hands and create 1" balls of cookie dough. You can add 1 tbsp of water to make the dough easier to handle, but I didn't and mine turned out very well
    5. Flatten the balls of cookie dough a little, making them thicker for softer cookies and thinner for crisper cookies
    6. Bake 6-8 minutes, depending on your cookie size, on a greased pan
    7. When you remove them they will still be a little gooey. Let set and cool for 5 minutes before moving from pan to cooling rack or plate
    8. Serve (or eat them all yourself)

    Friday, January 13, 2012

    Foodie Friday: Everything Pizza


    Pizza is delicious. It's wonderful. It's so covered in grease when you order it, and it's always not quite the same from frozen. So why not make it all yourself? It's not as daunting of a task as it may sound, making pizza crust and sauce. Here is a delightful recipe that I can suggest knowing that you will love it, because I have made it several, several times, and every slice was fantastic.

    I bought some chicken & mozzarella with Italian seasoning sausage and sliced that up with a tomato topping. Below you find the recipe for the pizza I made, minus the sausage. It makes 6 large or 8 small slices. Enjoy!


    Pizza Crust

    You will need:
    • 2 cups all purpose flour
    • 1 cup warm  water (about 100F)
    • 1/3 cup granulated sugar
    • 1 package active dry yeast
    • 1 tsp salt
    • 2 tbsp Italian seasoning
    • 2 tbsp butter
    1. Mix flour, sugar, and yeast in large mixing bowl
    2. Add seasoning and warm water (about 100 degrees Fahrenheit)
    3. Mix fully until dough becomes smooth
    4. Cover with plastic wrap and place in microwave or another warm spot in kitchen (try your microwave, but don't turn it on) for 30 minutes and allow it to rise to about twice its original size
    5. While crust dough is rising, prepare the sauce (below)
    6. Prepare a clean, floured surface such as a large cutting board or countertop on which to work the dough
    7. Preheat oven to 400F
    8. Place the risen dough on the clean countertop and knead about 10 times
    9. Begin to shape the dough with your hands
    10. Flatten the dough with a rolling pin until it is about ½” thick
    11. Transfer dough to a pizza pan (greased) or stone to top pizza
    12. Top with pizza sauce (recipe below), cheese, and desired toppings
    13. Melt butter and brush onto exposed crust
    14. Bake pizza for 15 minutes or until crust is golden brown and cheese is bubbling


    Pizza Sauce & Tomato Topping
    You will need:
    • 15oz (1 can) diced tomatoes
    • 6 oz (1 can) tomato paste
    • 2 medium/large cloves garlic 
    • ½ tbsp oregano
    • ½ tbsp thyme
    • ½ tbsp basil
    • ½ tbsp parsley(substitute spices for 2 tbsp Italian seasoning if desired)  
    • + ¼ tbsp Italian seasoning (for tomato topping)
    1.  Put tomato paste into medium mixing bowl 
    2. Strain tomato juice from diced tomatoes into mixing bowl 
    3. Save ¼ cup tomato chunks in small mixing bowl for tomato topping
    4. Finely chop or blend rest of tomato chunks and add to mixing bowl
    5. Peel and press garlic and add to mixing bowl
    6. Stir in spices until well mixed
    7. Do not cook on stove 
    8. Place directly on prepared pizza crust 
    9. Now for the tomato topping! Take 1/4 cup tomato chunks set aside and add 1/4 tbsp Italian seasoning
    10. Add 1 tbsp olive oil
    11. Add 1 tsp garlic powder
    12. Do no cook on stove
    13. Place on top of pizza after cheese and other toppings have been added
     Some other ideas:
    • Make the edge of the dough thinner and place cheese sticks on it. Roll the dough around it, using a little bit of water to mesh the crust together. Now you have stuffed crust pizza!
    • You can leave out the spices in the crust, use a Bar-be-que sauce with some monterrey jack cheese. Delicious!
    • Skip the sauce altogether and just do a butter garlic mixture and sprinkle some cheese over it. Now you have cheesy garlic bread.

    Friday, December 30, 2011

    Foodie Friday: Cream Cheese Danish


    Cream cheese danishes are delicious. I had never thought of making my own, and when I stumbled upon this recipe I decided to give it a go. It was delicious and so simple because the crust is made out of crescent rolls!

    This recipe makes 8 servings. I baked it in my 9x13" pan and it was the perfect size to cut into 8 pieces. You could cut the recipe in half, do it in an 8x8" pan and have 4 large or 6 small servings. Make sure you refrigerate it if you aren't serving it within an hour or two of baking it. I think the danish is delicious cold, but Jason said he liked it warm!

    You will need:
    • Danish:
      • 2 8oz packages of cream cheese softened
      • 2 8-count packages of crescent rolls (I used butter flake)
      • 3/4 cup sugar
      • 1 egg yolk
      • 1 tsp vanilla
      • 1 tsp lemon juice
    • Glaze:
      • 1 cup confectioners sugar
      • 1 tbsp butter
      • 1 tsp vanilla 
      • 1/4 cup milk (or less)

    1. Preheat oven to 350F
    2. Grease 9x13 pan and place 8 crescent rolls (1 package) on bottom, un-separated
    3. In a large bowl, beat together the rest of the danish ingredients and spread over crescent rolls
    4. Open second can of crescent rolls and break off 4 rolls individually. I usually let the dough stretch out a little and then place it over the cream cheese mixture however you see fit/pretty
    5. Bake for 30 minutes, or until the filling isn't completely jiggly and the crescent rolls are golden brown
    6. While cooling, make the glaze by melting your butter and then whisk the rest of the glaze ingredients together
    7. Drizzle over the danish and serve once it's cooled

    Have some fun with it! Try using the crescent roll dough and reshaping it, maybe cutting it with a cookie cutter, to decorate the top of your danish!

    Friday, December 23, 2011

    Foodie Friday: Baked Garlic Chicken


    Baked, breaded, garlic chicken. Those are 2 things I love, and one thing that is a perk. Baked, not fried, chicken. How delightful that this dish is so delicious and a fairly healthy meal! Jason and I made this for my parents and our friends on 2 separate occasions, and each time it was inhaled.

    This is adapted from a Jamie Oliver recipe which sounded quite good, and I always like putting my own little spin on things. We topped it with a white wine sauce (we used Julia Child's herbal white wine sauce or "Sauce Chivry", but that was very ambitious of us), but simply squeezing some lemon juice on top would be fantastic too. As sides, we served mashed potatoes and fresh steamed broccoli, both of which tasted wonderful with the herbal white wine sauce. This recipe makes 4 servings.

    You will need:
    • 4 boneless, skinless chicken breasts
    • 2 cloves of garlic
    • 15 saltine crackers
    • 1 tbsp parsley
    • 4 tbsp butter
    • 1 egg
    • 1 cup all-purpose flour
    • Pepper to taste

    1. Preheat your oven to 475F
    2. We'll start by preparing the breading. If you have a food processor, combine all your crackers, garlic, parsley, butter, and pepper (to taste) and run until you have a fine mixture
    3. If you do not have a food processor (guilty), then put your crackers, parlsey, and pepper in a large freezer bag. Crush using your hand or the bottom of a cup. Next, press your garlic into the bag. Use a fork to mash your butter and add to bag. Shake up the bag and use your hands and the cup to mix the breading ingredients together. Set bag to the side when finished
    4. Make three shallow, diagonal cuts in each side of each chicken breast. Place on a covered surface (freezer paper or a cutting board) and cover them with freezer paper or plastic wrap and beat them until they have flattened out some
    5. In a small bowl, beat your egg. On 2 separate plates, pour your flour and your breading mixture
    6. Prepare a flat baking sheet (using non-stick spray or foil) for your chicken
    7. Begin breading your chicken by first coating one chicken breast in flour. Next, dip your chicken in the egg, and then turn it over into the plate of breadcrumbs to fully coat it. Place on baking sheet
    8. Repeat breading process for each chicken breast
    9. Bake chicken for 12-15 minutes
    10. Serve as a whole breast with a lemon slice, or slice up and drizzle white wine sauce on top

    Enjoy!

    Friday, December 16, 2011

    Foodie Friday: Chocolate Coconut Bars, AKA "Pig Pens"


    My friend Alyssa made these for our sorority alum meeting one night and I had her send me the recipe that night. These yummy chocolate treats are so delicious, and so SO simple to make! It takes about 5 minutes to prepare before baking. Delicious. There is no way you can mess these up, and everyone is sure to love them! If you are looking for a dessert to bring to a holiday party this year, this is a great dish to bring! You do need to let these cool for at least 2 or 3 hours before cutting, so if you are making them for an evening event make them first thing in the morning or even the night before. The longer these have to sit to yummier they are!

    Make this recipe in a large pan (9x13), and it will make 25-30 small bars. I usually cut it in half and bake it in my 8x8 pan, yielding about 12-15 bars.

    You will need:
    • 2 cups whole oats
    • 1 bag milk chocolate chips
    • 1 bag coconut flakes
    • 1 can sweetened condensed milk
    • 6 tablespoons of butter (3/4 stick)
    • 1/2 cup sliced almonds
    • 1/2 cup chopped walnuts

    1. Preheat oven to 350F
    2. Melt butter in microwave and spread into bottom of pan
    3. Sprinkle whole oats evenly in bottom of buttered pan
    4. Spread chocolate chips to evenly coat oats
    5. Sprinkle coconut evenly over chocolate chips
    6. Mixed sliced almonds and chopped walnuts
    7. Sprinkle nut mixture over top of coconut. You may not have to use it all. I do not like a lot of nuts on mine and I always end up picking some off while eating them
    8. Drizzle ENTIRE can of condensed milk on top
    9. Bake for 25-30 minutes
    10. Place baking dish on wire rack to cool. Allow bars to cool to room temperature before cutting and serving. This could take 2+ hours

    Friday, December 9, 2011

    Foodie Friday: Butterbeer


    In case you haven't caught on yet, I am a pretty big nerd. And one of the things I LOVE is Harry Potter. Over the past few years I have tried a couple of different Butterbeer recipes in attempts to make myself feel a little more like a Hogwarts student, and I thought I would share my favorite one with you!

    Butterbeer is a delicious, sweet, warm drink. Did I mention it's really sweet? I like sweet things, and I feel like while this drink is sweet, it's not overly sweet like some desserts. This Butterbeer has a good balance to it and it is simply delightful to drink on a cold night, snuggled up on the couch. Or make a big batch and serve it at a holiday party!

    This recipe makes 4 servings and is from The Pastry Affair. They adapted the recipe from Huffington Post. Like I said, there are lots of Butterbeer recipes floating out there on the internet.

    You will need:
    • 4 12-ounce bottles cream soda, room temperature
    • 1 cup brown sugar 
    • 3/4 cup heavy cream
    • 4 tablespoons butter 
    • 1 teaspoon apple cider vinegar 
    • 1/2 teaspoon salt  

      Steps 1 & 2
      1. In a small saucepan, bring brown sugar and 2 tbsp water to a gentle boil. Let boil for one minute and then turn heat off. If you have a candy thermometer, the mixture should be 240F
      2. Add butter, salt, vinegar, and 1/4 cup heavy cream and stir until fully incorporated
      3. Allow to cool (the original recipe calls to be cooled to room temperature but I wanted to serve mine warm and not cold so I just let it cool for a few minutes so it wasn't scalding hot)
      4. Beat remaining heavy cream and 2 tablespoons of the brown sugar to make whipped cream topping (if you opt to use premade whipped cream, it won't have the same flavor or texture, but will still taste delicious)
      5. In 4 separate glasses, pour in 1/4 cup brown sugar mixture and 1/4 cup cream soda and stir together
      6. Fill the glasses the rest of the way with cream soda
      7. Top with whipped cream and serve immediately

      Friday, December 2, 2011

      Foodie Friday: Oatmeal Chocolate Chip Cookies


      Hope everyone had a wonderful Thanksgiving weekend! WELCOME TO DECEMBER! My favorite month of the year! I know the last thing we need right now is more food, but trust me, you'll definitely want this delicious treat.

      I love oatmeal chocolate chip cookies about 100 times more than oatmeal raisin cookies. I like to fool myself into thinking they are better for me than other cookies because of the oatmeal. Makes sense, right? Well, even if it doesn't, let's all agree to pretend for my sake, okay?

      This recipe is based on the classic Quaker Oats recipe. I fiddled with it a bit though, wanted to make a denser cookie, a little richer. So here was the end result. Turned out pretty well I think! This recipe makes about 3 dozen cookies, which are the best when served warm!

      You will need:
      • 3 cups oats
      • 1 ½ cups all-purpose flour
      • 1 cup brown sugar
      • 1 cup milk chocolate chips
      • 8 tbsp (1 stick) and 6 tbsp butter, softened
      • 1/3 cup granulated sugar
      • 2 teaspoons baking powder
      • 1 teaspoon cinnamon
      • 1 teaspoon vanilla
      • Dash of nutmeg


      1.     Preheat oven to 350 degrees Farhenheit
      2.     In a large bowl beat together sugars and butter until creamy
      3.     Add eggs and vanilla to bowl and beat into sugar mixture
      4.     Mix in flour, baking powder, cinnamon, and nutmeg, beating until fully incorporated
      5.     Stir or beat in oatmeal in 2-3 batches
      6.     Stir or beat in chocolate chips
      7.     Cover a cooking sheet with parchment paper (or foil) and scoop 1” balls of cookie dough onto sheet, leaving gaps of at least 1” between cookies
      8.     Bake for 8-10 minutes


      Friday, November 25, 2011

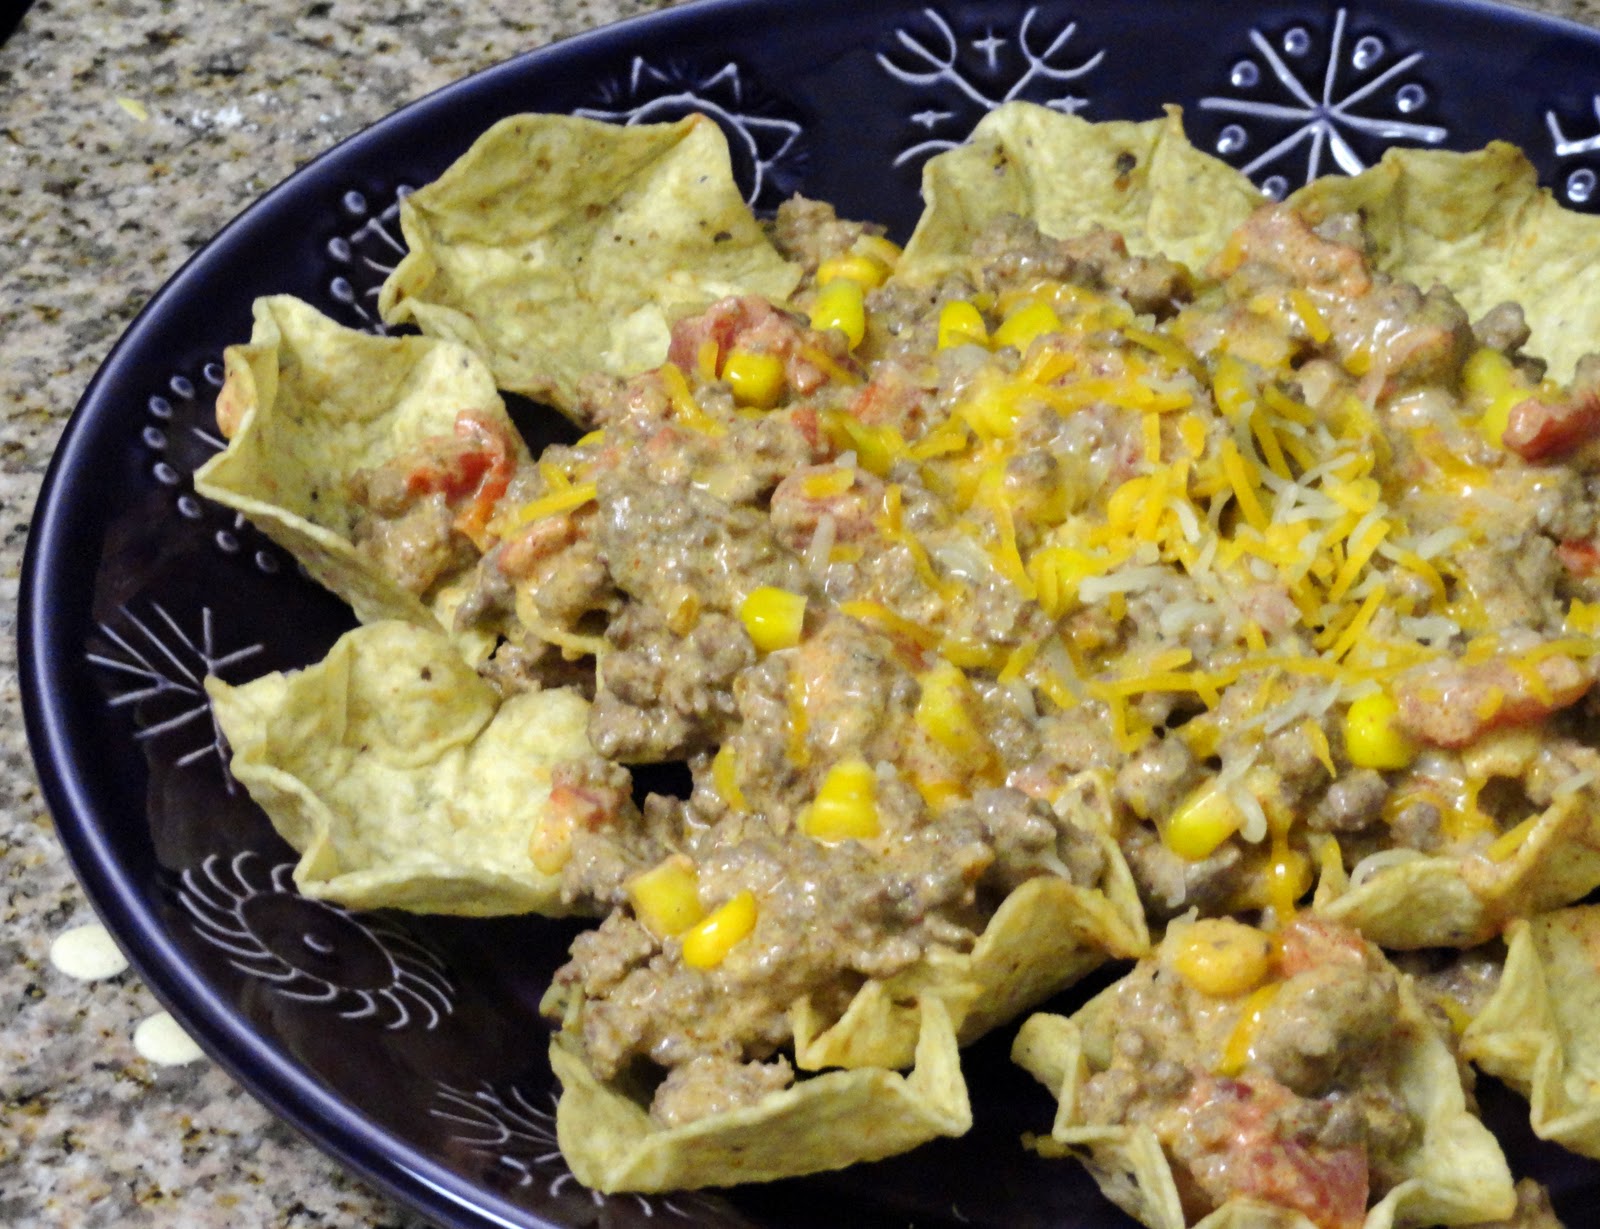
      Foodie Friday: Creamy Mexican Stove-Top Casserole, (DIY Philly Cooking Creme)


      A while ago Philadelphia released "Cooking Cremes" in several different flavors. My favorite by far is the Santa Fe Cooking Creme- it is spicy and has a definite mexican flare. The cooking creme can be a little pricey though, especially if you use the whole tub for one meal, so I decided to experiment and try to recreate a mexican cooking creme that I could use to make similar recipes. Also, I decided I wanted to make a cooking creme made from simpler, more pure ingredients.

      What I ended up with is a really great sauce, that you could use in a lot of different ways. This particular recipe mixes it with ground beef for a meaty casserole-type dish. I served hot from the stove over some tortilla chips, covered in cheese. You could also try it in some tortillas for a healthier option. This sauce contains sour cream, so be careful not to scald it!

      This recipe contains 2-4 servings, depending on how you serve them, and how big your appetites are.


      You will need:
      • 1lb lean ground beef
      • 1 cup frozen sweet corn
      • ½ packet McCormick taco seasoning
      • ½ cup sour cream
      • 5oz cream cheese (softened)
      • 7 oz (1/2 can, drained) diced tomatoes, or 1 can Mild RO-TEL (drained)
      • 2 cloves garlic
      • 1 teaspoon olive oil
      • Salt
      • Pepper

        1. Pour olive oil and press peeled garlic into large skillet. Cook over medium-high heat for 3-4 minutes
        2. Add ground beef to skillet, along with salt and pepper taste. Cook thoroughly on medium-high, stirring frequently, for about 10 minutes
        3. While the ground beef is cooking, in a small saucepan add sour cream, cream cheese, and taco seasoning. Cook over medium-low heat, stirring frequently, until combined (5-10 minutes, depending on how soft cream cheese was)
        4. Once beef is cooked, and cream sauce is combined, drain out the majority of the oil and grease. Then add the cream sauce, tomatoes (or RO-TEL if you want your dish have a little extra kick to it), and corn to the beef. Stir together
        5. Over medium-high heat, allow skillet to come to a simmer. Lower to medium heat and cover. Let cook for 8-10 minutes or until heated through, stirring frequently
        6. Serve over a bed of tortilla chips (or in tortillas) with Monterrey-Jack cheese sprinkled on top


        Other ideas:
        • Use the same cream sauce, same veggies, essentially the same method, but use chicken chunks. Then serve over Rotini pasta for a Mexican Skillet Pasta (much like the recipe provided by Philadelphia for their Santa Fe Skillet Pasta)
        • Bake some cheese enchiladas, covered in this sauce (haven't tried it, but it sounds good!), or switch it and bake this inside the enchilada with a cheese sauce on top
        • Cut the beef down to 1/2 pound (or cut it out completely), creating a creamier sauce, and serve as a warm dip at a party
        • Using 1/2 cup sour cream, and 5 oz cream cheese, add your own spices to create your own cooking cream! Then share your recipes here with us :)

        Friday, November 18, 2011

        Foodie Friday: Homemade Doughnuts, fast!


        Warm doughnuts are such a treat in the morning. It's just too bad that in the morning the line at the "DONUT" shop is always long and by the time you get your doughnuts home they aren't warm anymore. And let's face it, reheating those bad boys is just NOT the same thing. So here is my solution: Doughnuts made at home, from Grand's biscuits.

        Sound too good to be true? Well it's not. It is too true to be good, because I will now be wanting to make these all the time! I found this originally at Little Bit Funky via Pinterest and within 20 minutes my fiance and I were cooking them up as a midnight stack. Shh, don't tell anyone!

        So here is how you make these magnificent little treats.

        You will need:
        • Grand's Homestyle Buttermilk biscuits (I used flaky layers because it was all I had. It worked fine, but Homestyle is definitely preferred)
        • 4 tbsp butter, melted
        • Cinnamon
        • Granulated sugar
        • Vegetable oil
        • Tool to cut holes in doughnut 

          1. Start by pouring vegetable oil into a skillet so that it is about 1/2" deep
          2. While the oil is heating up, use a tool like a small cookie cutter or cupcake corer (that was my weapon of choice) to cut the holes in the center of the doughnuts
          3. Prepare a paper towel lined plate, pan, or even counter on which to place cooked doughnuts
          4. Once the oil is hot enough (steaming and beginning to lightly bubble), place doughnut in oil and cook on one side until golden brown. Then flip with tongs and do other side
          5. Remove doughnut and place on paper towel
          6. Repeat for all doughnuts
          7. Now melt your butter in the microwave
          8. In a pie pan or on a large plate, mix your cinnamon sugar together. I didn't measure, just started with some sugar and gradually mixed in cinnamon
          9. Lightly coat a doughnut with butter (preferably with a basting brush) and the roll in the cinnamon sugar mix until covered
          10. Repeat for all doughnuts
          11. Enjoy

          Other ideas:
          • Try skipping the cinnamon sugar and attempt some chocolate icing, powdered sugar, or even some toasted coconut!
          • Cook your doughnut holes too for a pop-able snack!

          Friday, November 11, 2011

          Foodie Friday: Easy Crescent Roll Italian Pie

          This week we have another easy meal! Using a few basic ingredients, I made an easy Crescent Roll Italian Meat Pie! I started at 8 exactly and served the plates at 8:50 (after it had cooled). So simple, and it was done in one pot on the stove and one pie dish in the oven. I was surprised how delicious it was! Serve it up with some steamed veggies and you have yourself a marvelous meal.

          This recipe makes one pie that has 8 slices. Adults will probably want two slices while the kids should be filled with one. You can always add a little more meat if you'd like (if you have a "deep dish" pie pan) or you can put veggies directly in the filling to make it more substantial. I would say this dish serves 4-6, depending on their appetites!

          You will need:
          1lb lean ground beef
          1 8-pack Crescent rolls (I used Big & Buttery)
          1/2 tbsp parsley*
          1/2 tbsp thyme*
          1/2 tbsp basil*
          A little less than 1/2 tbsp oregano*
          1/2 tsp garlic powder
          1 can tomato paste
          1/2 cup mozzarella
          1/4 cup parmesan

          *You may substitute seasoning for ~2 tbsp Italian seasoning and 1-2 medium cloves of garlic
          1. Preheat your oven to 375F
          2. In a 10" skillet, begin cooking ground beef on medium-high heat
          3. Add in your seasoning, stir and continue to cook beef on medium heat for 5 minutes
          4. Stir in can of tomato paste and one can of water
          5. Allow beef to simmer for another 5 minutes, or until done
          6. Pour beef mixture into ungreased pie pan
          7. Top with mozzarella and half of parmesan cheeses
          8. Open your crescent rolls, and before placing each one on, roll the widest end some so that it creates a "crust" when you place it on
          9. As you place the rolls on, you can rip of the tapered ends and use them to fill the gaps in between the crescent rolls near the "crust" (see below)
          10. After all of your crescent rolls have been placed, pinch together the rolled end of the dough
          11. Sprinkle the rest of your parmesan cheese on top of the crescent roll dough
          12. Bake for 15-20 minutes, or until crescent rolls are done and the middle is piping hot
          13. Let cool 5 minutes before serving