
We're back this Craft Tuesday with a simple craft, well 3 simple crafts really. These cloth flowers can be used to embellish many things. One of them you will recognize from my cloth bookmarks! You can stick these flowers onto headbands, brooch pins, hair clips, book covers, aprons... the list is as long as your imagination is big!
You will need:
- Hot glue gun (or fast-drying fabric glue)
- Various fabrics
Two of these flowers can be made with any cloth scraps you have laying around, so we will start with those.

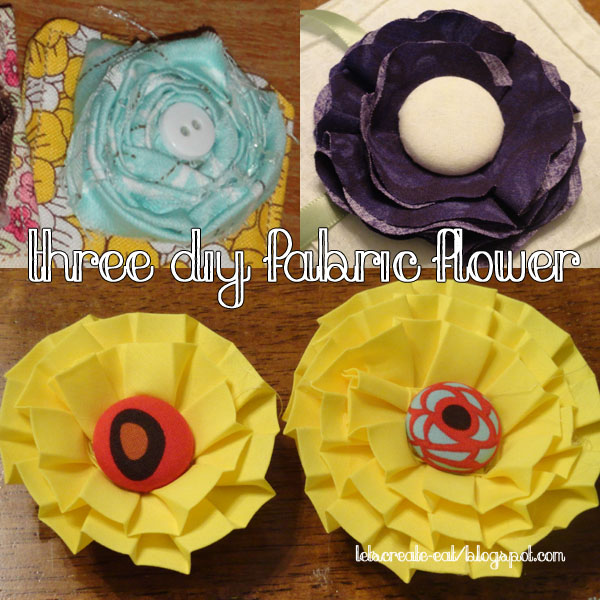
Flower #1: The Rolled Flower
Start by cutting one long strip of fabric (at least 30", the longer the strip, the bigger your flower), about 1/2" to 1" wide. On one end of the fabric strip tie a double knot. This knot will the center of your flower.
Now, with one hand (not your dominant hand) hold the knot and with the other hand begin twisting the fabric (the way you would twirl a lock of hair, so that is curls onto itself). As you twist the fabric, begin wrapping it around the knot with your other. It takes a bit of doing and I had to kind of go back and forth using both hands for each task. As you are wrapping, place glue about every 1/2" or so to make sure the flower stays together. When your flower reaches the desired size, take the end of your fabric strip and glue it (unrolled) onto the bottom of the flower.
Finish the flower with a button of your choice in the center (sewn or glued). If you're placing this on a head band or a pin, glue the flower onto a felt circle a little bit smaller than the flower, and then glue the headband/pin onto the felt.

Flower #2: The Flower with Petals
You will need to cut out 8 circles of the same size. My circles were about 2 1/2" wide. However big you want your flower to be, that's how big you should make your circles. After all of your circles are cut out you can do one of two things: 1) You can leave the circles with smooth edges and your flower will look very uniform and smooth. 2) You can fold your flowers in half or in fourths and trim the edges a little to give them some interest (pictured top left). As you are attaching them later, you can refold them so that the edges do not line up and it gives the illusion of more petals.
Now that your petals are cut out, cut out a circle of felt in a similar color to your fabric (or the background it will be going on), making the circle about 1/2" smaller than your flower. Fold one of your petals twice, so it looks like a slice of pie, and glue it so it stays in that shape, and then glue it onto the felt circle, with the point in the center of the circle. Repeat this 3 times so that you have four petals glued onto the circle (pictured top right). Glue down three more petals in the same fashion on top of the bottom four, covering as many "seams" between the petals as you can (pictured bottom left). Next, take one circle and fold it in half. Pull the two corners in towards each other so that the half circle folds up just a little. Glue this petal down and then attach a button on top (sewn or glued). For this flower, I used an upholstery button so that I could cover it with a corresponding fabric. These buttons can be found in the upholstery section of most craft stores in several different sizes.

Flower #3: The Pleated Flower
This flower uses pleated ribbon that you will find at any fabric/craft store in the ribbon by the yard area. It comes in many different colors, but is typically a stiff cotton, although you can find some cotton-sateen ones once in a blue moon at a regular craft store (at least around me it's a rarity). This is probably the simplest of the flowers. Start with one long piece (about 2') and glue down a thin fold of fabric at one end. Now begin make a circle with the pleated ribbon, gluing every 1/2" or so to ensure the ribbon does not unwind. Continue in this manner until your flower is the size you want it to be. When your flower reaches the desired size, take the end of your ribbon and glue it onto the bottom of the flower.
If you are going to attach it to a headband, pin, etc, glue a circle of felt on the bottom. Finish your flower off with a button. I used an upholstery button covered in one of my fabric scraps. I love using upholstery buttons because they are customizable. These buttons can be found in the upholstery section of most craft stores in several different sizes.
No comments:
Post a Comment