And I did.
And I tried it.
And it did not work.
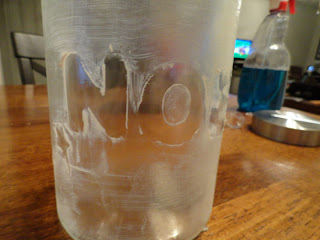
It really didn't fail terribly, this is true. It could have been much worse. It just didn't meet my expectations.
Perhaps my technique was not up to par, but I used a foam brush and the frosting ended up having brush strokes in it. It actually turned out to look pretty cool (my fiance said it reminded him of woodgrain), but it was not the desired "frosted" look for which I was aiming. And the "stencils" I used did not work at all (although, I believe that it just because they were too thick). So here is what I did, and what you SHOULDN'T do. Even though I wasn't entirely successful, I would like you to learn from my mistakes and then you will be able to do it on your own!
I started with another failed project, so maybe this jar is just jinxed. Remember the hot glue gun art project? I started with hot gluing on a jar, and it peeled off? Yah, that jar.
You will need:
- Glass object to be frosted
- FolkArt Enamels in Frost Medium (if you so desire) or Armour Etch
- Sponge brush
- A flat stencil (like a flat sticker or even tape for a simple design)
 |
| Right side: No frost Left side: Single coat of frost |
I then decided I wanted to apply a second coat that went horizontally. Mistakes #3 and #4. I didn't wait long enough between coats, and since I was working AGAINST the direction of the previous coat, it pulled up the previous coat. Oops. Also, I ended up not liking the cross-hatched look it created, but that's more of a personal opinion thing than a real mistake.
After I did 4 coats, I peeled off the stencils. They looked horrible. Like I said, the letters I chose were just all wrong. When YOU do this project, please, please learn from AT LEAST that mistake.
So, the side of the jar WITHOUT stencils (above) turned out fairly well. You could see the texture from the brush, which I wasn't aiming for, but it is kind of a cool look.
 Then I had an idea. I see people tinting jars with mod podge+paint, so what would happen if I swirled some of THIS on the inside of another glass jar? Luckily I had a spare, cleaned-out baby food jar. So I tested it and gave it a milk-glass look, and then when it dried completely it looked frosted, but there were some air bubbles. Pretty neat, but it took A LOT of paint for such a little jar. Perhaps if I have actually mixed it with Mod Podge. I just wasn't on my A game that night, was I?
So I wish I could have had a more successful project, but I think that one cannot really be creative unless they fail every once in a while.
Let me know what you have done or want to try using frosting or glass jars! Comment or submit your pictures and project ideas to be featured on Brag Thursday. I can't wait to hear all of your terrific ideas!


See the beauty and value of frosted glass by reading and looking of this page. Thanks that i found it.
ReplyDelete