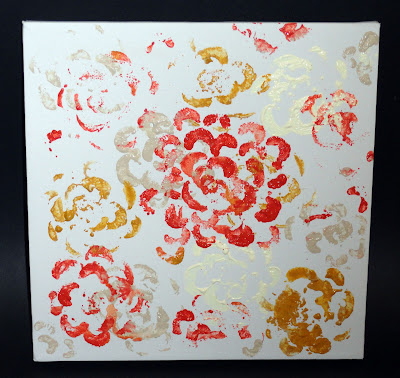
As I was browsing through the internet, on the hunt for a new craft project to try, I found the idea of using celery as a stamp. I was very familiar with using other foods (we all remember stamping with apples in elementary school), but the pattern of the celery gave a wonderful, flower-like shape. I filed it away in my head, telling myself "eventually." Well, a few days ago I saw some stamping projects and it really made me think about that celery. I checked my fridge, and my celery was starting to look like it had neared it's end, so I decided to go for it!
With very little planning (none at all actually), I pulled one of the extra canvases I have (I stocked up when they are on MAJOR sale), picked my most autumn-friendly colors, and had at it! Here is what I used (including the colors, in case you want to use the same ones I did), and my step-by-step instructions.
You will need:
- 1 12x12" canvas
- 4 colors of acrylic paint (FolkArt Buttercream, Linen, Yellow Ochre, and Autumn Leaves)
- 4 bowls to pour paint into
- 1 celery stalk (or remains of a stalk)
- 1 paint brush
- 1 kitchen knife
- Rubber bands


Start by cutting your celery stalk so that it is 3-4" long, just long enough for you to be able to have a really good grip on it. Now, take those pieces you cut off and trim them down so they are about the same length as the still-in-tact stalk.
Using rubber bands, arrange and attach the extra pieces of celery to the stalk to create a large bundle, which will give you a larger "flower." Start by adding the pieces with the bigger/wider ends, and then add the small ones. The rubber bands should all be between 1/2" to 1" of the end being stamped. To make sure they are all level on the end being stamped by placing the celery on a flat surface and pushing them gently down.
Now that your stamp is ready to be used, prepare your paints and canvas (whether you are using a real canvas or not- my fiance used the stamp after I did and stamped onto rice paper and it turned out very well, too).
 |
| With the first 3 colors on, using only the dipping technique |
For the first few colors, I dipped the celery directly into the paint, and it was a bit messy. For the last color I used a paint brush to paint the celery. I would HIGHLY suggest this second method; I would've wasted less paint if I had started this way, and I wouldn't have gotten as big of globs on the canvas. However, if you want the very textured look, then you can achieve this by leaving those globs on there. If you do decide to dip the celery directly into the paint, it wouldn't be a bad idea to wipe off SOME of the extra paint, otherwise the shape of the celery will be unrecognizable.
After I finished with the stamp, I took a single piece of celery, cleaned it off and used to for touch-ups and filler. I filled in the brightest colored flower towards the center and added extra to the outside so that I had one flower that was fuller, creating more of a focal point. Also, in the corners where there was little to no stamping, I mimicked a corner of the celery flower stamp, stacking 3 or 4 stamps.
I think it turned out really well for a first try with no real instruction! I hope you can learn from my mistakes and have fun making your own! I would love to see your celery (or any other kind of) stamping. Submit them and they'll be posted on Brag Thursdays!


Love how this turned out on my recycled paper bag. Although all my colors were pretty dark, didnt have the same depth as yours. Note to self-follow directions better!!! :)
ReplyDeletetotally going to do this with my preschoolers! thanks amy!
ReplyDeleteI'm so glad you guys liked the project! It's such a great one to do with little kids. You can also try to using ink made for stamping or tempera paint!
ReplyDelete