Tuesday, November 29, 2011

Craft Tuesday: Paint Chip Bookmarks


If you remember back to one of the first Inspiration Sundays, I focused on some of the fun things you could do with paint chips (and there are loads). Recently I went to Lowe's and picked up about 3 handfuls of different chips, including the strips. I knew exactly what they were for, too. Bookmarks!

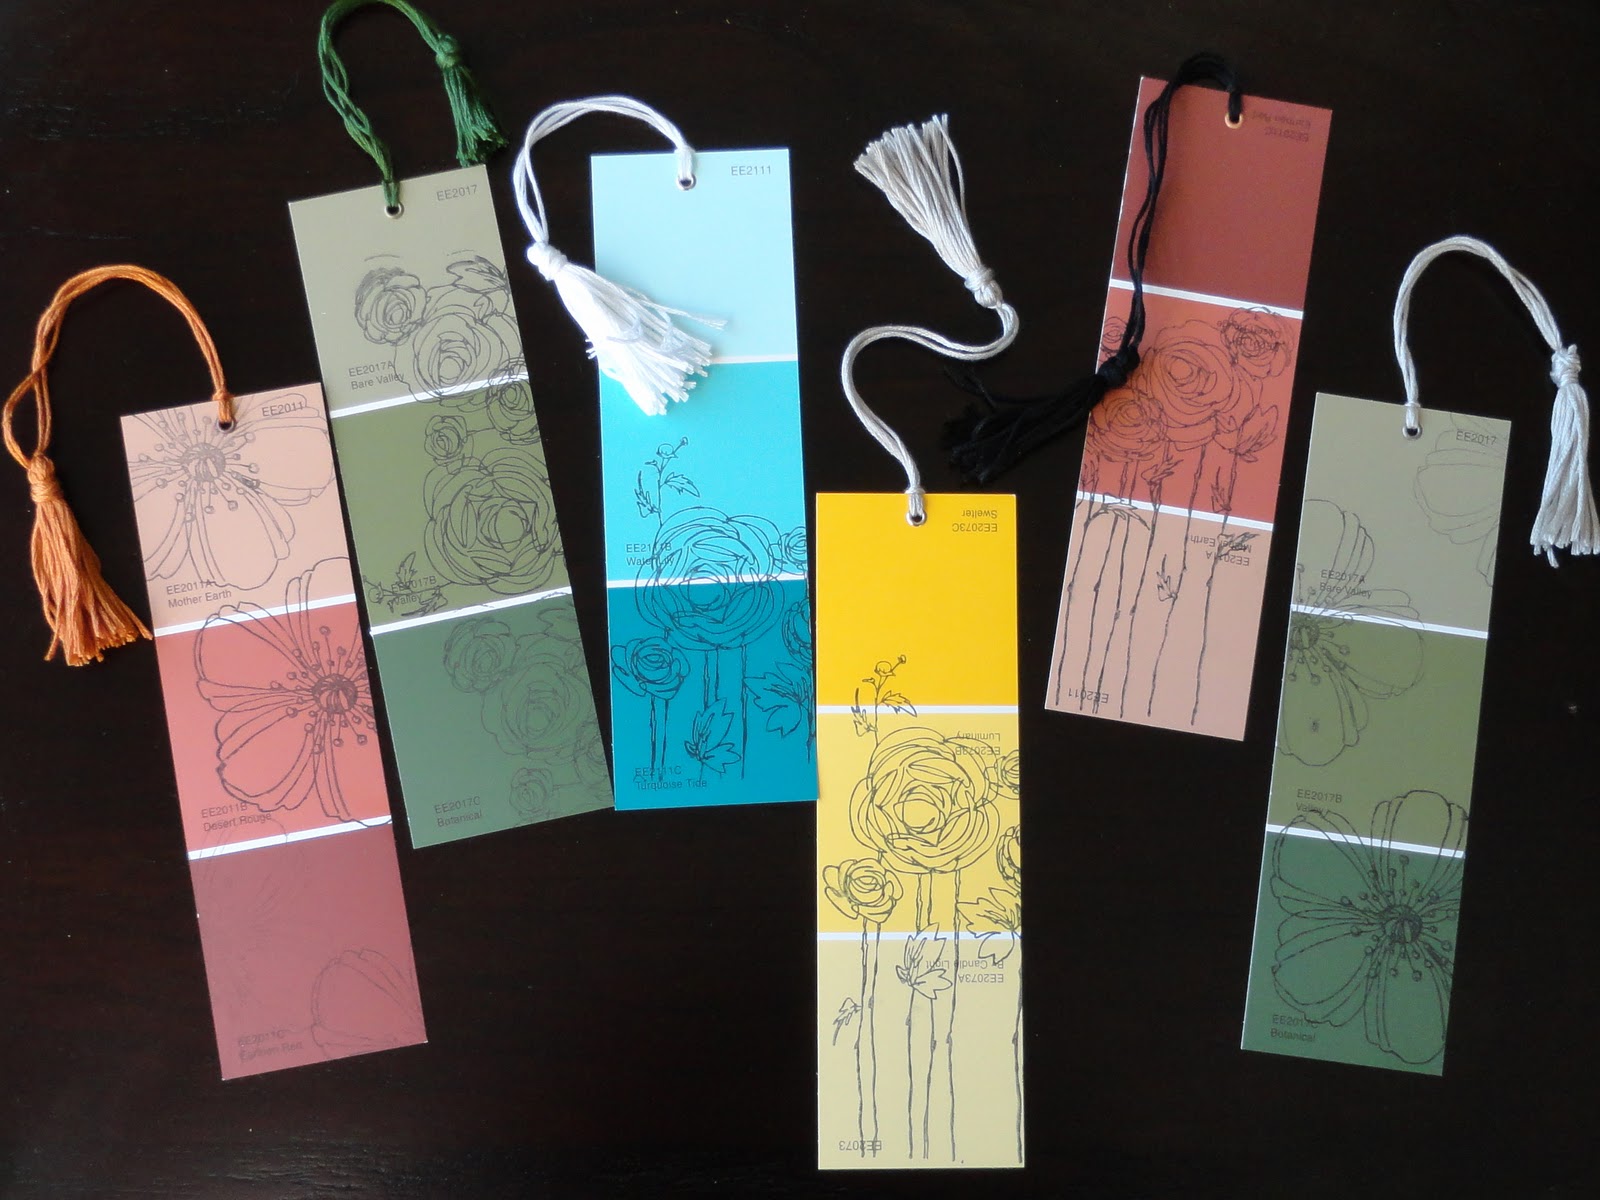
A couple of days later, after failing to be able to print directly onto a paint chip, I read up on stamping, bought 2 fun, floral stamps and some ink and had at it! I can not tell you how pleased I was with my results! So wonderful, especially when you consider how very, very little I spent on each bookmark. As soon as I finished this first round I told my fiance that I wanted to run back out to the store and get some holiday stamps and make more. His words were, "You're...silly." I prefer to call it creativity.
So, once I finished the bookmarks I had to add the tassel, and I was surprised how simple it was to make out of some embroidery floss and a large needle.
Now it's your turn! Go for it!

You will need:
  • Paint chip strips (free!)
  • Embroidery floss (1 pack makes 2-3 tassels and costs about $0.40)
  • Large needle
  • Stamp(s) of your choice (they range in price from a couple of dollars up to about $20, but they're not exactly an one-time-use item)
  • Stamp ink/dye (about $4 each)
  • Hole punch (I used the Clik-It eyelet setting tool and was able to set a small eyelet to protect the hole)

First you will need to prepare your work space with some sort of drop cloth or newspaper so you don't get ink everywhere. Then, pick your paint chip, your stamp, and your ink color. Lightly cover your stamp in the ink and press stamp firmly and evenly on paint chip. I used a large stamp so I only covered a portion of my stamp in ink, and I still managed to stamp my drop cloth a little.


When I did my large ranunculus stamp (the multiple flowers with stems), I did one stamp onto the chip and was done. However, when I did the other flower stamp I stamped multiple times without re-inking the stamp. The effect is very nice and really emphasizes one of the flowers (see above picture). Obviously, you can re-ink after each stamp in you'd like. It's up to you. Be creative! Be messy!


After I stamped all of my paint chips, I closed up my ink and washed my hands and stamps until (almost) all of the ink was gone. Different inks take different amounts of time to dry, so be sure that yours is dry completely before proceeding to the next step.


Now punch the hole for the tassel. I eyeballed it, but if you really want to measure it all out then feel free to. I aimed for smack dab in the middle horizontally, about 1/3" down from the top.  I have a Clik-It took that I use for scrapbooking that I used to make the holes and to do embossing. It worked perfectly and made a modest size hole that I was able to reinforce with small metal eyelets. This tool isn't very expensive and comes in handy. I would highly suggest investing in it if you are a crafter!

After I set my eyelets I made my tassels! I followed these simple instructions on WikiHow with a couple of exceptions. I would wrap your thread/floss around something flexible (I used a spare paint chip strip) because it will be nearly impossible to pull the thread through to make that first knot if you use something stiff like a ruler (I tried). Also, you will need a large needle. I don't know what size I used, but I was easily able to thread two pieces of embroidery floss through, so make it fairly large.


Lastly, when you actually lace the tassel through, push it from front to back. It looks nicer and the tassel will stay better when you lay your bookmark face up.

After that is laced in you are done! Make them for your friends, your family, yourself! Happy crafting (and reading!)

Sunday, November 27, 2011

Inspiration Sunday: Buttons


I recently decided to start collecting buttons so that I can all kinds of things with them! As always, I am constantly collecting ideas on Pinterest. Today I will share with you the wonderful things I would love to do using buttons!

Let's start with a great thing to do to make sure your buttons are the right color. Learn how to dye your buttons!

Found here, at what I believe to be a French Marie Claire inspired site?


A buttons charm bracelet!
This particular bracelet is sold, but you can find similar ones
at the same Etsy store.

For sale on Etsy, but really could make
with buttons, thread, and some raw silk stretched
over something.


Beautiful idea to add something special to a flower
arrangement! Found at GabbaGabbaGorgeous.

A button bowl. How awesome is this? I couldn't find the actual
DIY, so if you can claim credit for this please let me know
and I will be MORE than happy to give it to you! :)

A button tree made out of styrofoam cone, buttons,
and straight pins. From Better Homes & Gardens.
Make Christmas (or any kind of) cards!
So clever.

A button bouquet. Adorable. Just, so, adorable.

Use buttons to wrap packages! Another great idea
from Martha Stewart.


Someone posted this picture of a lovely pumpkin
onto Pinterest. What a simple, mess free way
to decorate a pumpkin!

Friday, November 25, 2011

Foodie Friday: Creamy Mexican Stove-Top Casserole, (DIY Philly Cooking Creme)


A while ago Philadelphia released "Cooking Cremes" in several different flavors. My favorite by far is the Santa Fe Cooking Creme- it is spicy and has a definite mexican flare. The cooking creme can be a little pricey though, especially if you use the whole tub for one meal, so I decided to experiment and try to recreate a mexican cooking creme that I could use to make similar recipes. Also, I decided I wanted to make a cooking creme made from simpler, more pure ingredients.

What I ended up with is a really great sauce, that you could use in a lot of different ways. This particular recipe mixes it with ground beef for a meaty casserole-type dish. I served hot from the stove over some tortilla chips, covered in cheese. You could also try it in some tortillas for a healthier option. This sauce contains sour cream, so be careful not to scald it!

This recipe contains 2-4 servings, depending on how you serve them, and how big your appetites are.


You will need:
  • 1lb lean ground beef
  • 1 cup frozen sweet corn
  • ½ packet McCormick taco seasoning
  • ½ cup sour cream
  • 5oz cream cheese (softened)
  • 7 oz (1/2 can, drained) diced tomatoes, or 1 can Mild RO-TEL (drained)
  • 2 cloves garlic
  • 1 teaspoon olive oil
  • Salt
  • Pepper

    1. Pour olive oil and press peeled garlic into large skillet. Cook over medium-high heat for 3-4 minutes
    2. Add ground beef to skillet, along with salt and pepper taste. Cook thoroughly on medium-high, stirring frequently, for about 10 minutes
    3. While the ground beef is cooking, in a small saucepan add sour cream, cream cheese, and taco seasoning. Cook over medium-low heat, stirring frequently, until combined (5-10 minutes, depending on how soft cream cheese was)
    4. Once beef is cooked, and cream sauce is combined, drain out the majority of the oil and grease. Then add the cream sauce, tomatoes (or RO-TEL if you want your dish have a little extra kick to it), and corn to the beef. Stir together
    5. Over medium-high heat, allow skillet to come to a simmer. Lower to medium heat and cover. Let cook for 8-10 minutes or until heated through, stirring frequently
    6. Serve over a bed of tortilla chips (or in tortillas) with Monterrey-Jack cheese sprinkled on top


    Other ideas:
    • Use the same cream sauce, same veggies, essentially the same method, but use chicken chunks. Then serve over Rotini pasta for a Mexican Skillet Pasta (much like the recipe provided by Philadelphia for their Santa Fe Skillet Pasta)
    • Bake some cheese enchiladas, covered in this sauce (haven't tried it, but it sounds good!), or switch it and bake this inside the enchilada with a cheese sauce on top
    • Cut the beef down to 1/2 pound (or cut it out completely), creating a creamier sauce, and serve as a warm dip at a party
    • Using 1/2 cup sour cream, and 5 oz cream cheese, add your own spices to create your own cooking cream! Then share your recipes here with us :)

    Tuesday, November 22, 2011

    Craft Tuesday: Winter Yarn Wreath


    A couple of weeks ago my Inspiration Sunday was all about yarn. Well I finally bought some yarn that matches my holiday colors (my tree is decorated with blue, white, and silver ornaments) and some wreath supplies. I had so much fun making this wreath! It took me about 4-5 hours of total work time. Of course I did not do this all in one sitting.
    So here is how to make this wonderful wreath! It's simple, but a little time consuming.


    You will need:
    • Wreath shape (I used 14" styrofoam)
    • Yarn in various colors
    • Cloth stem wire in dark brown
    • Black buttons
    • Snowflake "buttons"
    • Styrofoam balls in various sizes (I used 3.5", 2.5", and 2")
    • Hot glue gun & glue
    • Craft knife (steak knife will work too)


    Start by picking your design. I decided I wanted to stripe my blue and silver yarn and not section it off in any way. That made it easy so that I did not have to measure out and make marks where I needed to start and stop. Next, unravel a small bit of yarn and hot glue the end of the yarn string(s) to the top back of the wreath shape. Begin wrapping your yarn around the wreath, keeping it pulled taut. Every 2" I would suggest putting another dot of hot glue to save your yarn from coming unraveled. This took me quite a while, about 3 hours.

    After you have finished wrapping, congratulate yourself and go have a glass of wine or a nap, or both, because you deserve it!


    Next, you'll make your snow man. Begin by cutting off a bit off the top of the big ball, top and bottom of the middle ball, and bottom of the little ball. This will help the snowman pieces stack a little bit better and fit better into the wreath.


    Now take your white yarn and hot glue the end of it onto a flat side of one of the balls. Wrap your yarn around the ball and hot glue on the same side when done. Repeat this for all of the snowman pieces.
    Once your snowman is covered in yarn, hot glue the pieces together. Apply the glue and then hold the pieces firmly together for about 30 seconds while the glue dries. Once the whole snowman is put together, put it upright in a glass to let it dry fully.


    Buttons!
    While the snowman is set aside, pick your buttons for the snowman! I used 3 matte black buttons. Hot glue them on next.


    Now it's time to make your snow man's arms. Cut two 3-4" pieces of stem wire and twist them together. One on side, pull the two wires apart to make the snowman's "hands." Stick them in the middle section of the snowman. If they are too long, remove them, trim them down and reinsert.
    Now your snowman is complete!


    If you'd like something extra, you could give him a scarf with some scrap fabric.


    Now, lay for wreath and snowman down on a table and decide where you'd like your snowflakes and hot glue them on (if you'd like to include them at all). If you don't want to use snowflakes, I would suggest putting a bow on top of the wreath with some floral wire. Or do both!


    Lastly, put a big dollop of hot glue on the bottom of your snowman and glue him onto the wreath. Let dry and you are finished! Hang your wreath up and enjoy all winter!

    Sunday, November 20, 2011

    Inspiration Sunday: Candy Canes


    Candy canes are a holiday classic, even a staple to some. Growing up we always put them on our Christmas tree (of course half of them would be gone by Christmas day), and my mom would put a bundle of them in a Santa Claus mug on the kitchen counter perfect for stirring your hot chocolate with. I love them!

    Candy canes are definitely a prominent piece of holiday decor. But these days you can do so much more with candy canes! They are not just for trimming the tree anymore! So here are some terrific ideas I have collected of creative new ways to use your candy canes. Enjoy!


    A jar full of candy canes with a festive bow
    set out for all your holiday visitors to indulge!

    Candy cane sleighs, perfect for treats for adults and kids
    alike. Great for holiday parties, or wrapped up and
    stuffed in a stocking.

    Create candy cane reindeer using some yarn, googly eyes,
    ribbon, a bell, and pom-poms! Great craft for little kids.

    Make your own wool candy canes for decoration:
    ornaments, package toppers, stocking stuffers.
    DIY instructions at FeltCafe.

    I LOVE using candy canes as gift toppers,
    especially the giant ones for BIG packages.

    A ring of candy canes wrapped
    around a simple vase with some ribbon. Perfect!

    Three candy canes tied together for each place setting.

    Tie some candy canes around a
    plain pillar candle to make it a Christmas candle!


    Candy cane punch! Sounds wonderful for a Christmas party.
    Recipe at TasteOfHome.

    Make candy cane sugar cookies using a little bit of food coloring.

    Set candy canes of wax paper and fill them with fudge or chocolate.
    Terrific for portioning out peppermint bark!

    Crush up your candy canes and use them as a candy topper
    on your favorite chocolate cake recipe!